Few days ago we showed you how to install Magento eCommerce software in CentOS 7 and well as in Ubuntu 14.04. In those posts, we said Magento was a great software for anyone who wants to host and manage an eCommerce shop online.
Magento allows anyone to easily sell their stuff online and and also helps them engage their customers.
Besides Magento, there’s another great eCommerce solution called oSCommerce. Like Magento, oSCommerce is also a free opensource eCommerce suite which provides you sets of tools to host a complete online store for free.
oSCommerce has a great community of store owners, developers and other service providers. With over 7,000 free add-ons, you can customize your online shop the way you want it.
This brief tutorial is going to show you how to easily install oSCommerce in Ubuntu 14.04 if you haven’t already done so, and wish to open an online shop to sell your stuff.
Like Magento, oSCommerce also relies on the LAMP stack which include Linux, Apache or other web server, MySQL and PHP.
Before installing oSCommerce, lets’ go ahead and install the LAMP stack in Ubuntu. To do that, run the commands below.
sudo apt-get install apache2, mysql-server mysql-client php5 php5-dev php-mysql php5-gd php5-xmlrpc
During LAMP installation, you’ll be prompted to create a new root password for the MySQL database server. When prompted, type and confirm the root password.
You’ll need the root password to sign onto the database server after installing.
After installing LAMP, go and begin configuring each server. Since OsCommerce uses databases to host and store data, let’s go and create a new database for it.
For our tutorial, we’re going to create a database called oscommerce.
- Creating OsCommerce database
First, run the commands below to start MySQL database server if it isn’t started. To do that, run the commands below
sudo service mysql start
Then run the commands below to sign onto the database server as root.
mysql -u root -p
Next, run the SQL statement below to create a new database called oscommerce
CREATE DATABASE oscommerce;
Next, create a database user, the user who database account will be used to connect to the database. To create a database user called oscommerceuser, run the SQL statement below.
CREATE USER oscommerceuser@localhost IDENTIFIED BY 'type_password_here';
Then grant the user all privileges to the database by running the commands below.
GRANT ALL PRIVILEGES ON oscommerce.* TO oscommerceuser@localhost;
Exit and you’re done.
Now that you’ve created the database, it’s now time to download OsCommerce files. To do that, run the commands below.
cd /tmp/ && wget http://www.oscommerce.com/files/oscommerce-2.3.4.zip
Next, run the commands below to unzip the downloaded file.
unzip oscommerce*.zip
Next, run the commands below to copy OsCommerce files to Apache2 default root directory.
sudo cp -rf oscommerce*/* /var/www/html/
Then run the commands below to change the configuration files permissions so that you’ll be able to configure its initial settings. To do that, run the commands below.
 sudo chmod 777 /var/www/html/catalog/includes/configure.php

sudo chmod 777 /var/www/html/catalog/admin/includes/configure.php
Next, run the commands below to start up Apache2 web server.
sudo service apache2 start
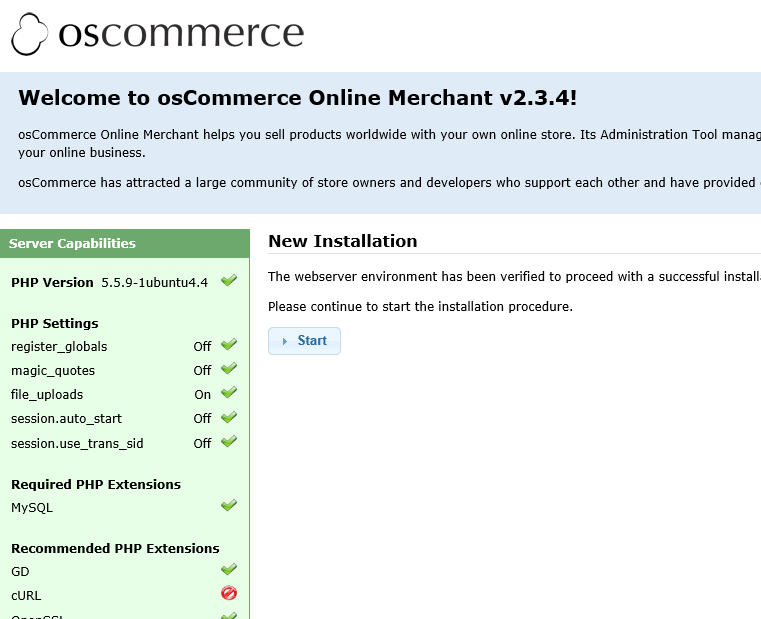
After starting up Apach2, open your favorite and browse to the server via hostname or IP address followed by /catalog (eg. www.myhost.com/catalog)
You’ll see the new installation page as shown below.
Continue to the next page and type the database user name and database name and click Continue.

Enter your store and other information and continue. When you’re done, you should be able to sign on to the administration area or your online store.
Enjoy!
After installing, remove the installation directory to protect your site. To do that run the commands below.
sudo rm -rf /var/www/html/caatalog/install
Change the permissions on these files are well.
 sudo chmod 644 /var/www/html/catalog/includes/configure.php

sudo chmod 644 /var/www/html/catalog/admin/includes/configure.php
That’s it!