Few weeks ago we showed you how to install VSFTPD in Ubuntu. We also said because FTP implemented in its standard form is inherently insecure, it’s recommended to enable FTP over SSL/TLS encryption or secure FTP (SFTP).
This brief tutorial is going to show you how to secure your FTP communication by using encryption. FTP communications that are not protected with encryption make it possible for someone with the right tools who sits on your network to intercept and retrieve vital information.
Secure FTP helps prevent this type of attack and protects your data while in transit. If you haven’t already implemented secure FTP, then it should be one of your most important tasks to do if you want to secure your online servers.
To get started with securing VSFTPD server in Ubuntu, continue below. We’ll will show you how it’s done and how to using FileZilla FTP client to connect to the server.
- Installing VSFTPD in Ubuntu 14.04
First, go ahead and install VSFTPD server in Ubuntu. To do that, run the commands below.
sudo apt-get update && sudo apt-get install vsftpd
Next, open VSFTPD default configuration file and make these changes below. Go line by line and make these changes starting with disabling anonymous login.
Open VSFTPD configuration file by running the commands below
sudo vi /etc/vsftpd.conf
Anonymous login allows anyone to connect to your FTP server without authentication. To disable that, change the parameter below to NO
anonymous_enable=NO
Next, enable local user with accounts on the server to logon to the FTP server. To do that, change the parameter below to Yes.
local_enable=YES

allow_writeable_chroot=YES
Next, make sure that users with accounts have write access on the server. This means that users will be able to create/delete folders, and add content when they logon.
To make that change, set the parameter of the line below to Yes.
write_enable=YES
If you also want local account users to only work or jailed in their own home directory and don’t want them navigating to other parts of the server, you should change the line below to Yes.
chroot_local_user=YES
After that, save the file and continue to the next step.
- Creating And Applying the SSL Certificate
After making the changes above, lets go and create our encryption key or certificate to use to connect to the server. First, create a folder that will be used to store the keys.
To do that, run the commands below.
sudo mkdir /etc/ssl/certificates
Then run the commands below to create the encryption key that will last for 365 days.
sudo openssl req -x509 -nodes -days 365 -newkey rsa:2048 -keyout /etc/ssl/certificates/vsftpd.pem -out /etc/ssl/certificates/vsftpd.pem
After creating the key, go and change add and change these parameters in the default VSFTPD configuration file.
sudo vi /etc/vsftpd.conf
Add / modify the changes below at the end of the file and save.
rsa_cert_file=/etc/ssl/certificates/vsftpd.pem

rsa_private_key_file=/etc/ssl/certificates/vsftpd.pem

ssl_enable=YES

allow_anon_ssl=NO

force_local_data_ssl=YES

force_local_logins_ssl=YES

ssl_tlsv1=YES

ssl_sslv2=YES

ssl_sslv3=YES

require_ssl_reuse=NO

ssl_ciphers=HIGH
Save the file and restart VSFTPD server.
sudo service vsftpd restart
‘
- Connecting Using FileZilla
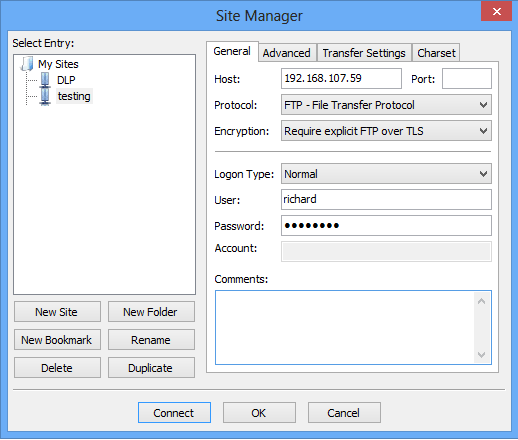
Next, open FileZilla and create a new profile. Create the profile as shown below. For encryption, select Require explicit FTP over TLS
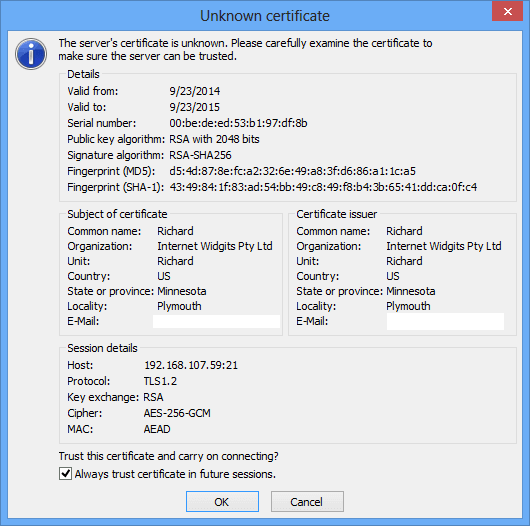
Accept the unknown certificate to continue
Enjoy!