WordPress 4.0 will be released soon, possibly next week and this brief tutorial is going to describe installing and testing it in CentOS 7. There are some new features that are included with this new update.
Features like embedded URL previews in the visual editor, the media library has a grid view now, visual changes to how plugins get installed and many more, including the new widgets customizer.
If you wish to test WordPress beta or release candidates, you may use WordPress beta tester plugin. It can be downloaded free from here. This plugin allows you to easily become a WordPress tester by upgrading your WordPress to the latest beta version.
You can then test new features before they’re actually released to the general public. Please be aware that it’s not recommended to install WordPress beta tester on your production WordPress sites or upgrade to WordPress beta versions.
Use it only for testing purposes.
Now, to learn how to install WordPress 4.0 in CentOS 7, continue with the steps below. The steps below show you in detail, how to get this working.
- Installing WordPress package requirements
Before installing WordPress on CentOS 7, there are some packages that must be installed. These packages include web server (Apache), Database server (MySQL), PHP scripts and modules.
To install all of them using one line commands, copy and paste the line below on your screen and press Enter.
yum -y install httpd mariadb-server mariadb php php-gd php-ldap php-pear php-xml php-xmlrpc php-mbstring php-snmp php-soap curl curl-devel php-mysql
After running the above commands, all the packages that WordPress depends on will be installed. Now, it’s time to begin configuring each package.
First, configure the database server and create a new database user and user password.
- Configuring MySQL Database / Creating Database User and Password
Next, run the commands below to to start MySQL database server
sudo systemctl start mariadb.service
Then run the commands below to secure MySQL database server.
mysql_secure_installation
Running the above command will prompt you to create a root password (create it) and answer Y for yes and N for no during the setup. Also enter Y for yes when prompted.
Next, run the commands below to logon to the database server.
mysql -u root -p
Then run the SQL statement to create a new WordPress database called wpdb (switch to MySQL database first using the command use mysql; )
CREATE DATABASE wpdb;
Next, run the commands below to create a WordPress user named wpuser with password
CREATE USER wpuser@localhost IDENTIFIED BY 'password_here';
Finally, run the commands below to grant the user access to WordPress database
GRANT ALL PRIVILEGES ON wpdb.* TO wpsuer@localhost;
Exit and you’re done.
- Downloading WordPress content
Next, do and download WordPress content. To do that, run the commands below.
cd /tmp && wget http://wordpress.org/latest.zip
Then unzip the file and copy WordPress content to the default Root Directory in CentOS 7.
unzip latest.zip
Copy WordPress content to the default Root Directory
sudo cp -rf wordpress/* /var/www/html/
Next, change ownership of WordPress content to Apache 2.
sudo chown -R apache:apache /var/www/html/
Then change permission on the directory as well.
sudo chmod -R 755 /var/www/html/
For WordPress to work, it must connect to a database. Since we’ve already created a database and user, lets use that. WordPress also comes with default setup sample file. The sample file contains directives to connect to a database server.
Let change the sample file into a valid configuration file. To do that, run the commands below.
sudo cp /var/www/html/wp-config-sample.php /var/www/html/wp-config.php
Then let’s change the database settings in the wp-config.php file to match what we’ve created.
sudo vi /var/www/html/wp-config.php
Then change the settings as shown below to match the ones for your database and save the file.
// ** MySQL settings - You can get this info from your web host ** //
/** The name of the database for WordPress */
define('DB_NAME', 'wpdb');

/** MySQL database username */
define('DB_USER', 'wpuser');

/** MySQL database password */
define('DB_PASSWORD', 'data_user_password');
- Allow HTTP/HTTPS Traffic through the firewall
To access the WordPress site remotely, you must enable port 80 traffic for web. To do that run the commands below
sudo firewall-cmd --permanent --zone=public --add-service=http
sudo firewall-cmd --permanent --zone=public --add-service=https
Reload the firewall and continue
sudo firewall-cmd --reload
Finally, start or restart these severs and services.
sudo systemctl start httpd.service
sudo systemctl start mariadb.service
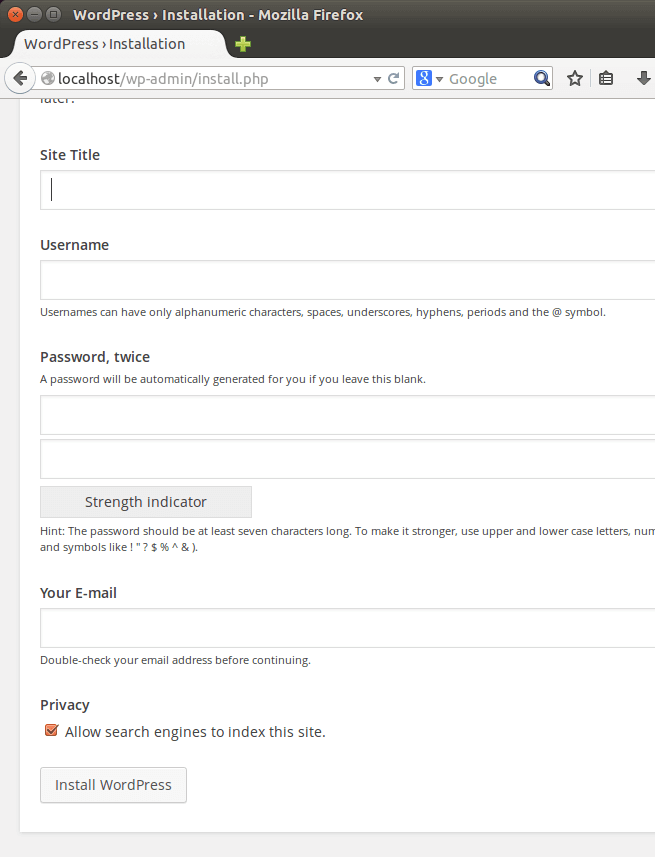
If your followed the stops above correctly, you should see WordPress page as shown below when you open a web browser and connect to the server.
Enjoy