This brief tutorial shows new users or webmasters how to use Parked Domains (aka. Domain Pointer) in CPanel to change host providers.
Parked Domains is a great feature that allows webmasters to migrate to a different host easily without losing existing user traffic.
It easily allows you to point or park additional domains to your existing hosting account. With it, you have example1.com and example2.net point to the same content.
Parked Domains can also be used to move your website content to another web host without too much work. All you have to do to make your web content visible on the new host is to use your new host provider’s nameservers for your domain.
Let say you registered for a new domain at godaddy.com. You also host your website with godaddy.
In the future if you decide that Godaddy isn’t serving your needs, you can copy or migrate your website content to another host. Then enable the Parked Domains feature with your existing domain name.
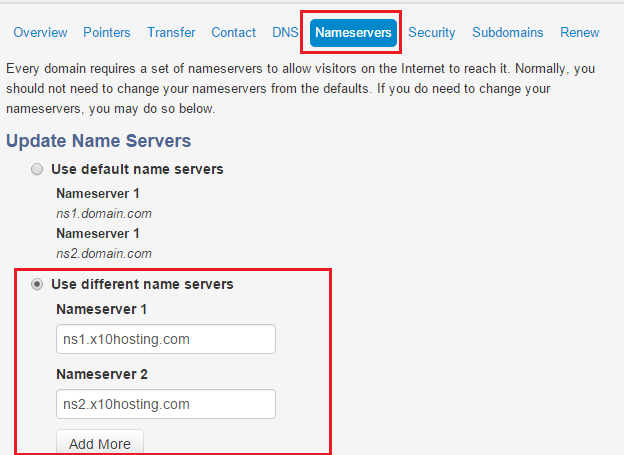
All you have to do is to go back to your Godaddy domain account and turn on custom nameservers. In the nameservers field, enter your new host nameservers there.
After propagating, content hosted with your new provider will be shown to your audience.
This is how it’s done:
Logon to your account using CPanel.. then go to the Domains section and click Parked Domains
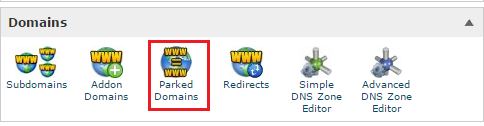
There, you’ll add your domain and click Add.

After adding, point the domain to your document root folder, usually /public_html and save.
After that, go to your domain provider and change the nemeservers to point to your current host.
Find your current host nameservers and enter them there and save.
After the changes are saved and few minutes have passed, content hosting on at your new host will be shown to your audience.
You can then go back to your hold host and cancel your hosting account with them.
That’s it! Enjoy!