A graphics card is often referred to as the GPU or Graphics Processing Unit that handles all the graphic-related tasks in Windows OS. However, certain software or games require certain graphics cards to run and one must know which graphics card is installed on their system.
In Windows 10, you can check your system’s graphics card via Device Manager, System Information App, Task Manager, Command Prompt/PowerShell, third-party tools, and the DirectX Diagnostic Tool. This guide explores them all.
Let’s Begin!
How to Check/Find Graphics Card in Windows 10
To find which graphics card is installed on your system, consider the below-stated approaches:
- Device Manager.
- System Information App.
- Settings App.
- Task Manager.
- Command Prompt/Windows PowerShell.
- DirectX Diagnostic Command
- NVIDIA Control Panel (For NVIDIA GPUs Only).
- AMD Radeon Settings (For AMD GPUs Only).
- Third-Party Tools.
Let’s find what graphics card your system has via the above methods.
Method 1: Check/Find the Graphics Card in Windows 10 Via the Device Manager
The Device Manager in Windows hosts the information of every hardware (including graphics card) installed on your system. To check the graphics card via the Device Manager, open it via the Start Menu and double-click on the Display adapters.
Under the Display adapter, you can find the names of all the graphics cards installed on your system:
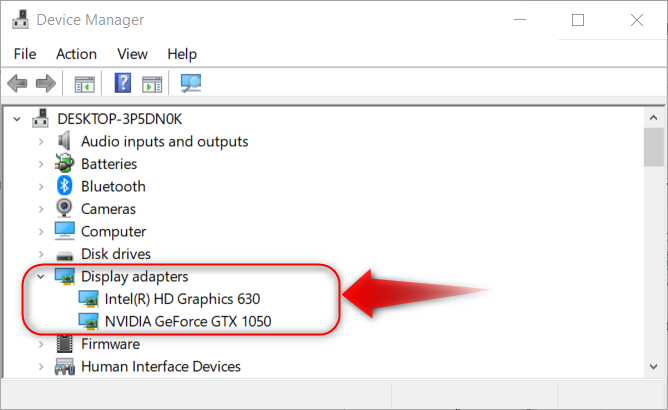
Note: Device Manager will only show the graphics card when its drivers are installed.
Method 2: Check/Find the Graphics Card in Windows 10 Via the System Information App
The System Information app holds all the technical details about the system’s hardware and also includes your system’s graphics card. To check graphics cards using the System Information app on Windows 10, use the Start Menu to search and open System Information.
After opening the System Information app, select Components and then Display from the left pane to view the graphics card details on the right pane:

Method 3: Check/Find the Graphics Card in Windows 10 Via the Settings App
To view the graphics card currently in use on Windows 10, press the Windows + i keys to open the Settings app and navigate to System ? Display ? Advanced display. From here, you can view the details of the currently in-use graphics card on Windows 10:

Method 4: Check/Find the Graphics Card in Windows 10 Via the Task Manager
The Task Manager is known for managing the system’s processes and services but it also shows the basic information about the system’s components including the graphics card. To check the graphics card in Windows 10, press the CTRL + Shift + Esc keys to trigger the Task Manager, click/tap on the Performance tab, and finally on the GPU:

Method 5: Check/Find the Graphics Card in Windows 10 Using the Command Prompt/PowerShell
Run the following command in either Command Prompt or PowerShell to check the graphics card on Windows 10:
wmic path win32_VideoController get name
Method 6: Check/Find the Graphics Card in Windows 10 Using the DirectX Diagnostic Command
After installing DirectX on your system, you can use the dxdiag.exe or DirectX Diagnostic command to check the details of the graphics card installed on your system. To check the graphics card in Windows 10, open the Start Menu search for dxdiag, and open it. From here, select Display 1 for internal GPU and Display 2 for external GPU:

Method 7: Check/Find Graphics Card in Windows 10 Using the NVIDIA Control Panel (For NVIDIA GPUs Only)
If you are using the NVIDIA-manufactured graphics card on your system, you can use the NVIDIA Control Panel to check the exact model of your graphics card. To check the NVIDIA graphics card in Windows 10, open the NVIDIA Control Panel using the Start Menu and it shows the current driver version and the graphics card model:

Method 8: Check/Find the Graphics Card in Windows 10 Using the AMD Radeon Settings (For AMD GPUs Only)
If you are using AMD’s GPU, you can find the exact model using the AMD Radeon Settings. To check the AMD graphics card, open AMD Radeon Settings via the Start Menu and navigate to System ? Software. From here, you can check the graphics card’s details.
Method 9: Check/Find the Graphics Card in Windows 10 Using the Third-Party Tools
A large variety of free tools are available for Windows 10 that allow you to view the system’s hardware in detail. These tools can also output detailed graphics card information. Among the popular tools, we recommend using the TechPowerUp GPU-Z or Speccy.
The TechPowerUp GPU-Z is specific for viewing all the information about the GPU and you can individually check the details against each GPU as well:
The Speccy is a versatile third-party tool to view the specifications of the whole system including their temperature. To check the graphics card, open Speccy and select the Graphics:

That’s all for checking the Graphics card in Windows 10.
Final Words
To check/find the Graphics Card in Windows 10, use the Device Manager, Settings App, Command Prompt/PowerShell, Task Manager System Information App, or DirectX Diagnostic Tool. If you are using an NVIDIA or AMD GPU, use the NVIDIA Control Panel or AMD Radeon Settings apps to check their respective details. Additionally, you can use third-party apps such as TechPowerUp GPU-Z or Speccy to check the graphics card on Windows 10, as explained in the above guide.