In recent years, IaC (Infrastructure as Code) tools have become essential to us when provisioning and managing our IT infrastructure components. The secret behind these tools is they automate the above-mentioned manual process through a simple code. This is very beneficial when we have to handle many infrastructure components.
One of the popular IaC tools is Terraform by HashiCorp, and it is much easier to provision and manage IT infrastructure components using this tool. In this article, we will discuss how to create and initialize a Terraform folder after writing some Terraform configurations using HCL (HashiCorp Configuration Language).
Let’s get started!
Terraform folder
Imagine we are building a web application. Before doing any task, the first thing we do is create a folder. This folder will contain all our web application’s source files and folders. Generally, this folder is known as the working directory. Similarly, in Terraform, we should also create a folder, and that folder is called the Terraform folder.
Below is the content we typically see inside an initialized Terraform folder.
- Terraform configuration file: This includes the code we write to describe the resources Terraform should provision or/and manage.
- .terraform directory: Terraform uses this folder to,
- Control cached modules and provider plugins,
- Record currently active workspace and last known backend configuration
This folder is created after the initialization.
- State data: Terraform stores these data in a terraform.tfstate file (if the directory only uses the default workspace) or a terraform.tfstate.d directory (if the directory uses multiple workspaces).
Next, we see what is initializing a Terraform folder.
Initializing a Terraform folder
When we provision and manage infrastructure components with Terraform, we have to ensure that our working directory or Terraform folder is ready to provision and manage those IT resources in our Infrastructure. Within the Terraform folder, there should be dependencies and plugins that are necessary to perform general operations in Terraform.
So, how can we ensure our working directory is ready?
To ensure, we should initialize the Terraform folder/ working directory. Terraform provides us with a command called ‘terraform init’, which will do the following tasks to prepare the working directory.
- Initializing the backend.
- Downloading and installing provider plugins.
- Accessing the state.
- Downloading modules.
Let’s walk through the steps for successfully initializing a Terraform folder.
Steps to initialize a Terraform folder
Mainly, there are four steps we can follow from scratch.
- Download and install Terraform.
If our system does not have Terraform installed, we must download it from their official website and install it according to their installation guide.
We can skip installing Terraform if we already have it on our system.
- Create the Terraform folder.
As the second step, we need to set up our Terraform folder, also known as the working directory.
- Create a Terraform configuration file.
As the third step, we should create a Terraform configuration file. Typically, we name this file ‘main.tf’, and inside it, we will write our configuration as a code using HCL. This code describes how we want Terraform to manage our infrastructure components.
- Initialize the Terraform folder/ working directory.
When we finish writing the Terraform configuration file, we can initialize the Terraform folder using the earlier command: ‘terraform init’.
Let’s take an example to understand the above four steps clearly.
Let’s say we want to create a local file called ‘Sam.txt’ in the Desktop folder. To do that, we will write our Terraform configuration file ‘main.tf’ inside the folder called ‘myPet’. Inside the ‘Sam.txt’, we will add some text: ‘My pet’s name is Sam, and I love my pet’. In this scenario, ‘myPet’ will be our Terraform folder, and we use Terraform to provision the ‘Sam.txt’ file.
As the first step, we have to download and install Terraform. Let’s assume that we already have installed it on our system.
So the next step is to create the Terraform folder: ‘myPet’. Assuming we are on a Linux distribution, we will create it as shown below.
$ mkdir myPetNow we can navigate inside the ‘myPet’ folder and create the Terraform configuration file: ‘main.tf’.
$ cd myPet

$ touch main.tf
Now, we have created our configuration file. Next, we open an IDE and write the code to provision the resources we need by Terraform. Below is the code.
resource "local_file" "myPet" {

filename = "Path/to/your/Desktop/Sam.txt"

content = "My pet's name is Sam and I love my pet"

}
As you can see, we created a resource block, including the ‘local_file’ as the resource type and ‘myPet’ as the resource name. You can choose any resource name, but it must be relevant to the subject.
As the attributes, we have ‘filename’, which specifies the location for the file creation and the file name with the file extension. Then we have ‘content’, which stores the text that needs to be included in the text file.
Now, as the last step, we can initialize our Terraform folder.
$ terraform initIt will give us the below output.
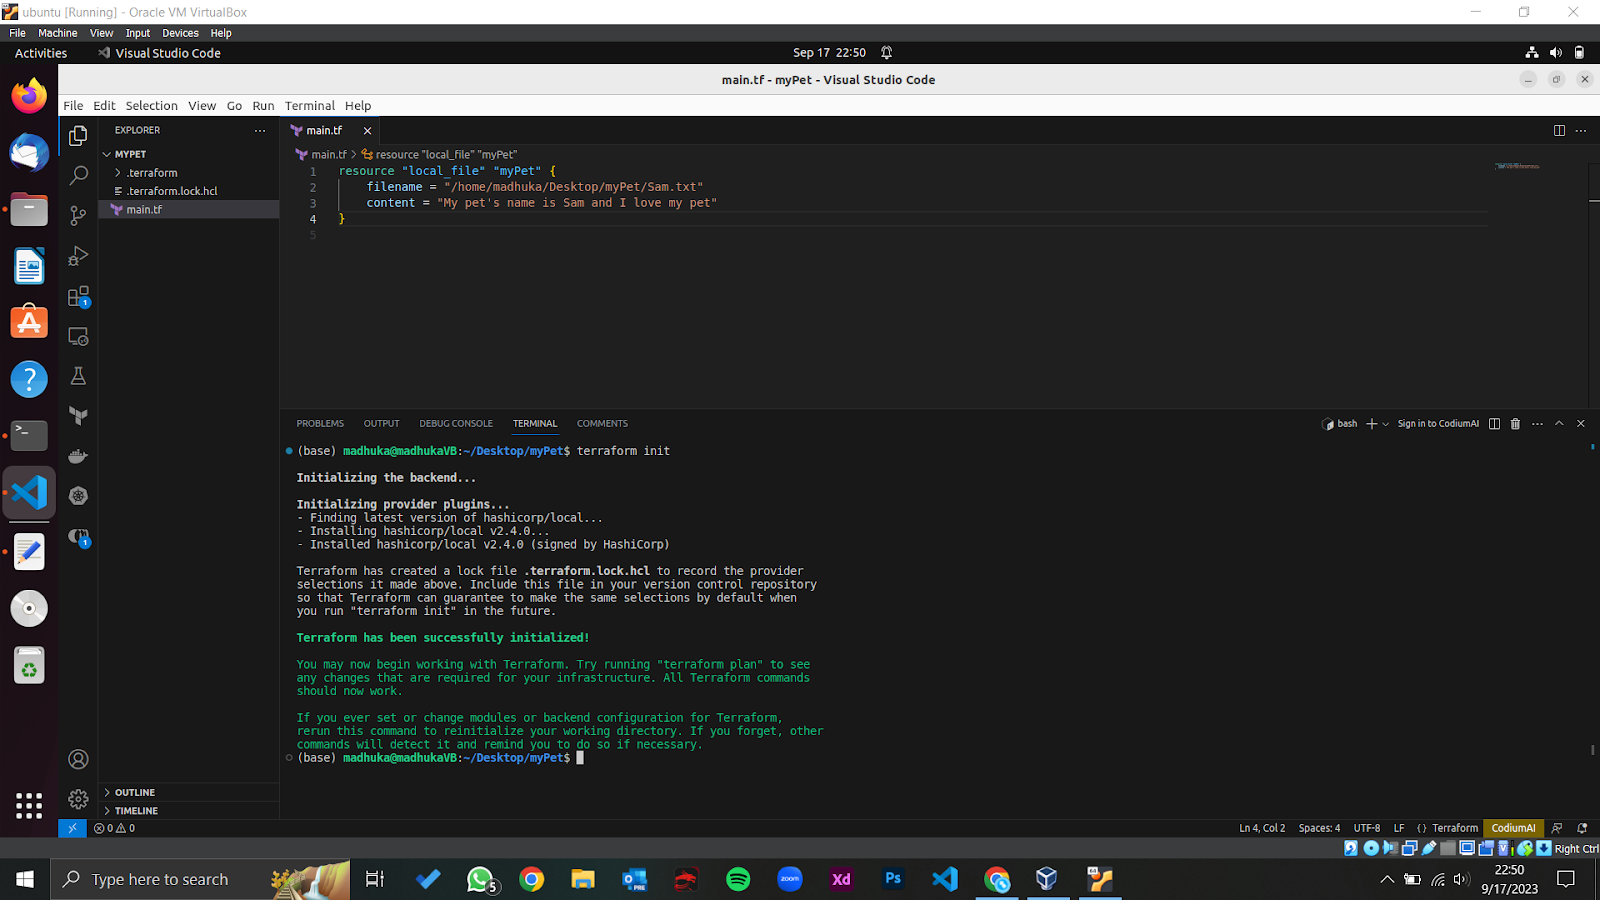
As you can see, we have successfully initialized our Terraform folder.
Conclusion
As we learned, initializing the Terraform folder or the working directory is the first step in provisioning and managing the IT infrastructure components using the Terraform tool. Without initializing it, we can’t perform other major actions such as Terraform plan, apply, etc. We discussed four main steps to initialize a Terraform folder from scratch, along with an example.
So, It is our responsibility to utilize the ‘terraform init’ command to have a better and smoother infrastructure provisioning and management experience with Terraform.