PyTorch is a framework in Python language for designing neural network models using the torch library. The torch library contains the nn dependency that refers to the functions or methods for building the structure of neural networks. A Convolutional Neural Network or CNN is a deep learning model to understand and predict objects or images using classification/segmentation, etc.
Outline
- What is a Convolutional Neural Network or CNN
- How to Design a Convolutional Neural Network Model in PyTorch
What is a Convolutional Neural Network or CNN
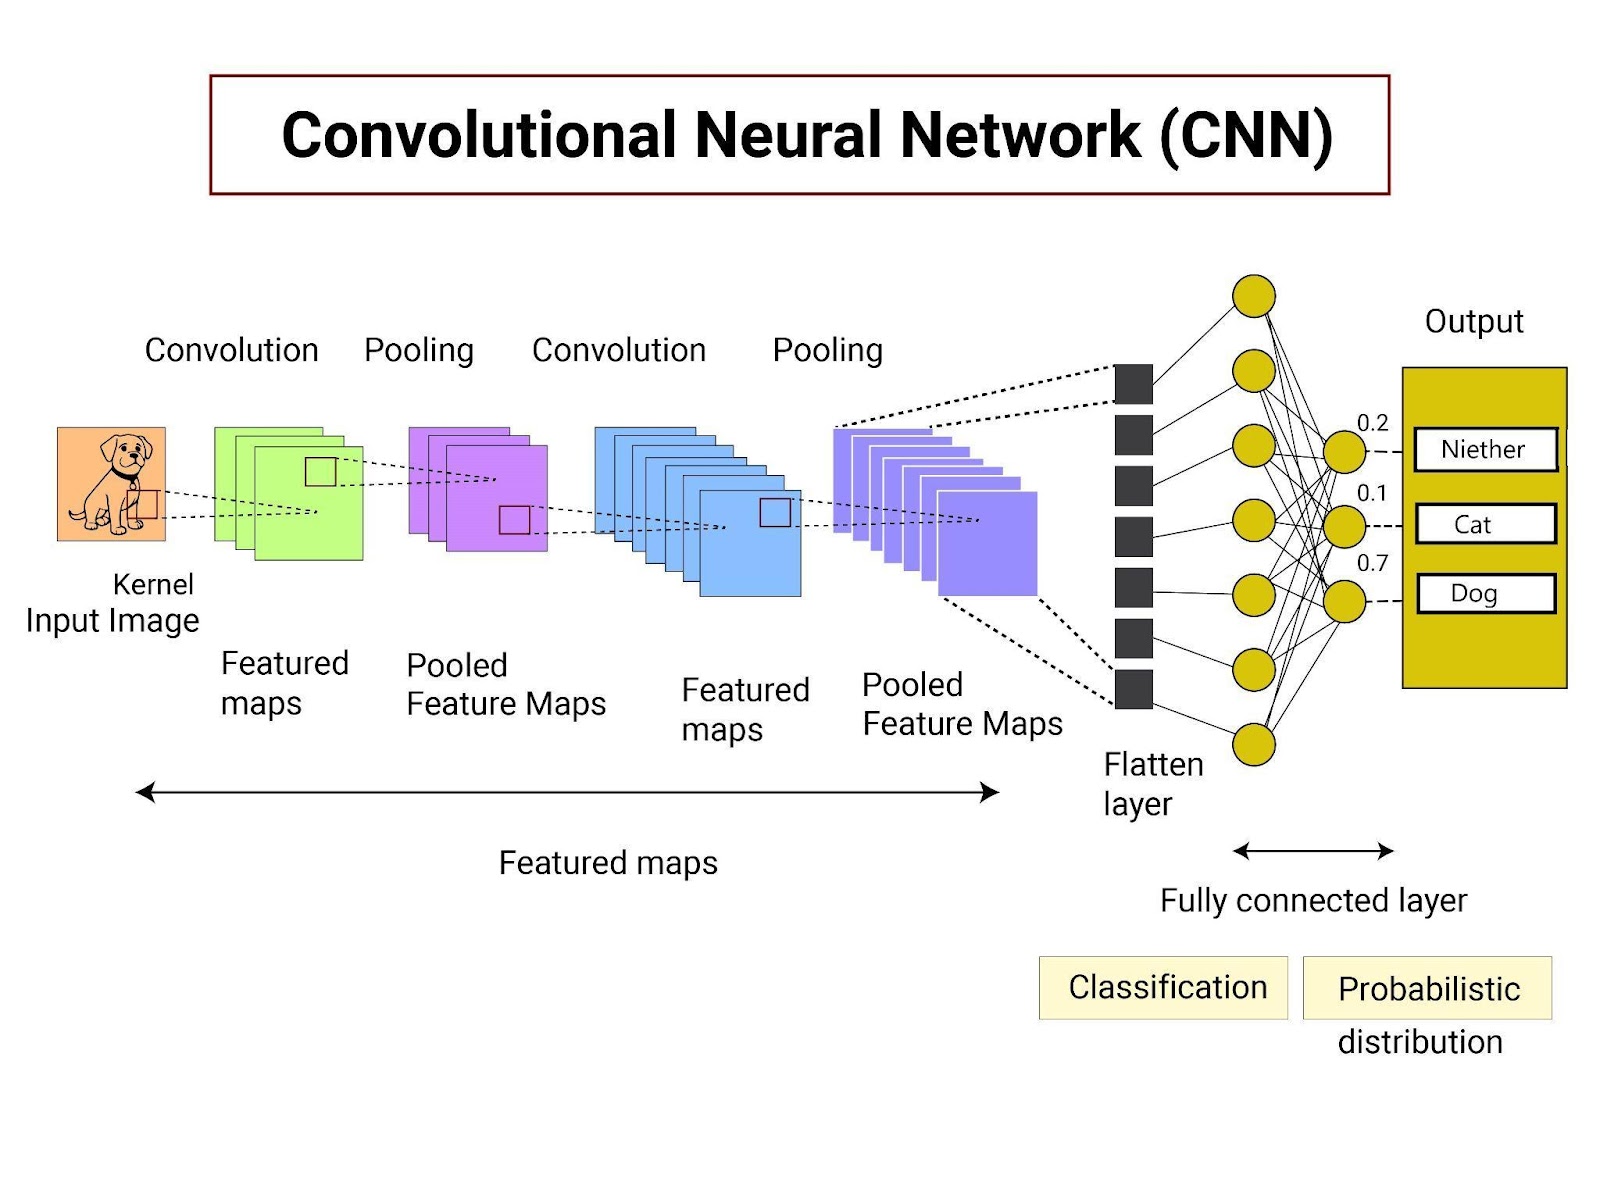
Convolutional Neural Networks are built on top of the neural networks and are considered the building blocks of deep learning. It works efficiently in recognizing images or objects and finding the differences among them. CNN uses multiple layers to extract the features from the dataset and find their hidden patterns to understand the unseen data. The CNN layers define the working architecture of the model and they are explained below:
- The Convolutional Layer is the first layer that gets the input data and extracts the important features from the images. The image is stored in a matrix or 2D array for the model to understand its features easily.
- After that, comes the Pooling Layer which is used to get only necessary features from the data using the average or max pooling. The pooling gets the average or maximum number from the matrix to convert a huge matrix into a smaller one. Additionally, it can be limited to 1D data using the Flatten() in PyTorch.
- The last layer is the Fully Connected Layer which uses a simple neural network structure to find the output:
How to Design a Convolutional Neural Network Model in PyTorch
Designing the CNN model using PyTorch to solve the image classification or object identification problem using its dataset. After loading the dataset, create the structure of neural networks with multiple layers of CNN and train the model using it. To learn the process of designing the CNN model in PyTorch, simply go through the listed steps:
Step 1: Importing Libraries
Start the implementation process by importing the torch library and its dependencies using the following code:
import torch
import torch.nn as nn
import torch.optim as optim
import torchvision
import torchvision.datasets as d
import torch.utils.data as u
import torchvision.transforms as t- The nn dependency provides the methods for building neural networks like CNN, RNN, etc.
- Another dependency from the torch library is optim to improve the performance of the model.
- Import the torchvision package that contains datasets and architecture for neural networks.
- It also allows the user to transform or normalize the dataset according to the structure of the model.
Step 2: Extracting Database
After that, get the dataset from the torchvision package for training the convolutional neural network model:
alter = t.Compose([t.ToTensor()])

train = d.CIFAR10(root='./data', train=True, download=True, transform=alter)
test = d.CIFAR10(root='./data', train=False, download=True, transform=alter)
trainloader = u.DataLoader(train, batch_size=32, shuffle=True)
testloader = u.DataLoader(test, batch_size=32, shuffle=True)- Create the “alter” variable to store the tensors from the torch library and transform the values of the dataset.
- After that, define the train and test variables with the CIFAR10() method to store the dataset.
- Download the training dataset using the true value in its argument and use the true value in the train argument as well.
- Also, download the test sample using the false value in the train argument so it won’t be used in training.
- Now, load the training and testing dataset using the DataLoader() method with its arguments.
- Load both the datasets using their variable names in the argument and then set the batch_size value for training on shuffled data.

The above screenshot displays that the dataset is downloaded and verified successfully and it consists of 60K images. These images are split into two sets as the “train” variable stores the majority of images around fifty(50) thousand and the test variable has 10 thousand data points.
Step 3: Building CNN Model
Now, it is time to build the structure of the Convolutional Neural Network or CNN using the following code:
class CNN(nn.Module):
    def __init__(a):
        super().__init__()
        a.conv1 = nn.Conv2d(3, 32, kernel_size=(3,3), padding=1) #First convolutional layer with the dimensions of that layer
        a.act1 = nn.ReLU() #Activation Function
        a.drop1 = nn.Dropout(0.3) #Dropping non-important features

        a.conv2 = nn.Conv2d(32, 32, kernel_size=(3,3), padding=1) #Second convolutional layer with the dimensions of that layer
        a.act2 = nn.ReLU()#Activation Function
        a.pool2 = nn.MaxPool2d(kernel_size=(2, 2)) # Pooling Layer to Reduce dimensions

        a.flat = nn.Flatten() #Returning One Dimensional output

        a.fc3 = nn.Linear(8192, 512) #First Fully connected layer
        a.act3 = nn.ReLU() #Activation Function
        a.drop3 = nn.Dropout(0.5)
        a.fc4 = nn.Linear(512, 10) #Second Fully connected layer

    def forward(a, x): #Feed forward to get the flow of the model
        x = a.act1(a.conv1(x)) #first layer which is convolutional
        x = a.drop1(x) #ignoring features that are not required
        x = a.act2(a.conv2(x)) #another convolutional layer
        x = a.pool2(x) #pooling layer to reduce the data
        x = a.flat(x) #making the complete data in single dimensions
        x = a.act3(a.fc3(x)) #first fully connected layer
        x = a.drop3(x) #ignoring features that are not required
        x = a.fc4(x) #second fully connected layer
return x- Define the class CNN with its neural network Module as the argument.
- Use the constructor to design two convolutional layers with their activation functions and pooling layers after them.
- The first convolutional layer takes the input from the user and passes it through the activation function to get the important features of data.
- The second convolutional layer takes the data of the important features and reduces the data using the MaxPool2d() method in 2×2 dimensions.
- After that, initialize the flat variable with the Flatten() method to convert all the data into a single dimension.
- Now, create two fully connected layers at the end to get the output from the model.
- The first fully connected layer gets the data after dimensionality reduction and applies the activation function.
- The second fully connected layer takes the input from the previous layer and produces the final prediction.
- Define another method in the class called forward() to place the layers in the feedforward structure.
Step 4: Setting up Metrics
Here, create the model variable to store the CNN() and initialize the loss variable with the CorssEntropyLoss() method. Finally, call the SGD() optimizer in its variable to optimize the model’s parameters using learning rate and momentum:
model = CNN()
loss = nn.CrossEntropyLoss()
optimizer = optim.SGD(model.parameters(), lr=0.001, momentum=0.9)
Step 5: Training the Model
Now, start the training process using the CNN structure to get the predictions using the given dataset. Use the following code to set the structure of the training process and print the accuracy after each iteration:
n_epochs = 30
for epoch in range(n_epochs):
    for inputs, labels in trainloader:
        pred = model(inputs) #Predictions from the model
        loss = loss(pred, labels) #Loss value of the model
        optimizer.zero_grad() #optimizing the model using gradient descent
        loss.backward() #Backpropagation to minimize the loss
        optimizer.step()

    accuracy = 0
    count = 0
    for inputs, labels in testloader:
        pred = model(inputs)
        accuracy += (torch.argmax(pred, 1) == labels).float().sum()
        count += len(labels)
    accuracy /= count
print("Epoch %d: model accuracy %.2f%%" % (epoch, accuracy*100))- Create the n_epoch variable and initialize it with a 30 suggesting the number of iterations for the training phase:
- Call the for loop with the number of epochs and call another for loop inside it making the nested loop.
- Now, get the inputs from the data and store the outputs in the pred variable using the model() variable calling the CNN class.
- Also, calculate the loss value by comparing the predicted values with the labels of the images from the actual data.
- After that, apply the gradient descent using the zero_grad() method to improve the model’s performance.
- Use the backpropagation technique on the loss value using the backward() to minimize the loss value.
- Lastly, calculate the accuracy of the model using another for loop on the sample from the testloader variable.
- Get the predictions on the test data and calculate the accuracy of the model by comparing it with the actual data.
- Finally, print the accuracy of the model with each iteration to show the improvement in the model with each epoch:
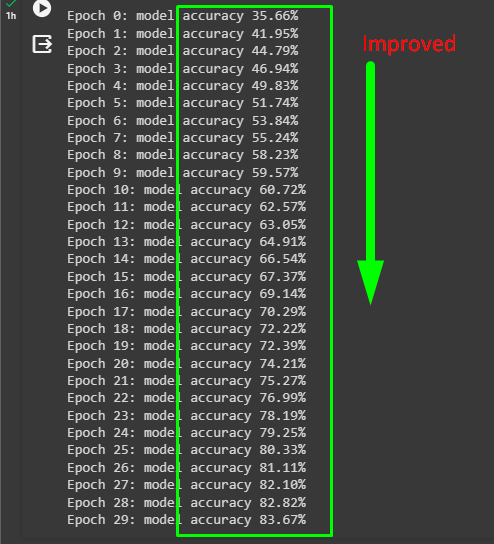
The above screenshot displays the growth of the CNN model on the CIFAR10 images dataset with 10 different classes. At the start, the model didn’t perform well with only 35% accuracy which means that the predictions are not very good. However, with multiple iterations, it finished at 83% accuracy and it is considered a good performance.
That’s all about how to design a CNN model in Pytorch.
Conclusion
To design the convolutional neural network or CNN model in PyTorch, simply get the nn dependency of the torch library. Use its functions and methods to set the structure of the model and extract the dataset from the torchvision’s package. Apply the CNN on the dataset to train the model and extract the performance of the model using the accuracy and loss value across multiple iterations. Improvement in the model’s accuracy with each iteration shows that the model is predicting more accurately on the unseen data.