In Java, we get data from the end user through classes like Scanner, BufferedReader, and JOptionPane. Out of these classes, the “Scanner” is the most popular class that provides flexibility and has several methods. These methods help us create interactive Java programs that are useful to perform operations based on the user’s needs.
This guide explains the usage of a Scanner class in Java by covering the mentioned sections:
- Scanner Class Constructors
- Methods of Scanner Class in Java
- How to Use Scanner Class in Java?
- Bonus Tip: Create an Array By Taking Values From User Using Scanner Class
- Alternative Approach: Use of BufferedReader Class Instead of Scanner Class
Scanner Class Constructors
The Scanner is a built-in Java class provided by the “java.util” package. This class uses its constructors to read the data entered by the end-user over the console. There are different variations of constructors depending on the type of operations required to be performed when text is entered by the user. These different variations of a Scanner class constructor are stated below:
| Scanner Constructor | Description |
|---|---|
| Scanner(File fileName, String charset) | This constructor defines values scanned from the “fileName”. The value must belong to the specified “charset” or “encoding” format. |
| Scanner(File fileName) | It creates values scanned from the “fileName”. |
| Scanner(String strSource) | It builds a new Scanner with values scanned from the provided “strSource” string. |
| Scanner(inputStream streamSource) | This constructs values scanned from the passed input stream source. |
| Scanner(Path pathAddress, String charset) | This constructor constructs values scanned from the mentioned “pathAddress” in the specified charset or encoding format. |
| Scanner(Path pathAddress) | This constructor defines values scanned from the specified “pathAddress”. |
| Scanner(Readable readableSource) | It constructs values scanned from the provided “readableSource”. |
| Scanner(ReadableByteChannel channel, String charset) | This constructed Scanner creates values from the provided “channel” in the specific charset or encoding format. |
| Scanner(ReadableByteChannel channel) | A Scanner is constructed that initializes the values scanned from the provided “channel”. |
| Scanner(inputStream streamSource, String charset) | This constructor defines values scanned from the provided streamSource with specific charset representation. |
Methods of Scanner Class in Java
The Scanner class offers several functions that serve different functionalities, such as restricting a user from entering a specific type of data. These methods are explained below in the tabular format:
| Method | Description |
|---|---|
| nextByte() | Reads or restricts the user to enter only a byte value. |
| nextFloat() | Tells the user to enter only float or decimal-based upcoming values. |
| nextBoolean() | Reads a boolean-based value from the user data. |
| nextLine() | Reads only String data type value from the user-provided data. |
| nextShort() | Prompts the end user to type only “short” data type value. |
| nextDouble() | Restricts the user to type value having the data type of “double”. |
| nextInt() | Tells the user to enter a single “int” type character. |
| nextLong() | Restricts the user to enter values having the data type of long. |
| next() | It reads only a single String as it stops reading the remaining part of the sentence whenever a space is encountered. |
Moreover, the “Scanner” class offers methods to check the data type of character that is going to be entered by the user. These methods along with their description are illustrated below:
| Method | Description |
|---|---|
| hasNext() | Provide information about the ending of tokens provided by the user. It returns “true” if there are remaining tokens and returns “false” if the provided input is ended. |
| hasNextFloat() | This method of the Scanner class returns “true” if the next or upcoming token has the data type of “float”. |
| hasNextInt() | This method returns “true” if the upcoming token has the data type of “int” else returns “false” |
| hasNextLine() | Identifies the existence of a new line or String in the user-provided input. |
| hasNextShort() | Check if the data type of the next token is set to “short” or not. |
| hasNextDouble() | The value of “true” is returned, if the upcoming token has the data type of “double” else returns “false”. |
| hasNextByte() | This method returns “true” if the next token has a data type of “Byte” or else returns “false” |
| hasNextLong() | It checks if the data type of the next token is “long” or not and returns the boolean value of “true” or “false” accordingly. |
How to Use Scanner Class in Java?
To use the “Scanner” class in Java, the programmer must start by importing the corresponding “java.util.Scanner” package. After importing, the scanner class object is created using the “new” keyword and the Scanner class constructor. Pass the “System.in” parameter to the “Scanner” constructor to perform the read or input operation from the terminal window.
Let’s understand the usage of a Scanner class in Java by implementing a basic input retrieval program using the below-mentioned steps.
Step 1: Import the Scanner Class
Initially, import the “java.util.Scanner” utility into the current Java file using the “import” keyword, as shown below:
import java.util.Scanner;Step 2: Create an Object of Scanner Class
After importing the required “java.util.Scanner” utility, define an object of the “Scanner” class using the “new” keyword and Scanner() constructor. Now, pass the “System.in” as the first parameter of the “Scanner” class constructor. To store the user data into a specific “charset”, pass that charset or encoding scheme name as an optional second parameter. As shown below:
Scanner insertion = new Scanner(System.in, StandardCharsets.UTF_8.name());Step 3: Implementing the Scanner Class Methods to Take User Inputs
Use the Scanner class methods according to your requirements to achieve the desired outcomes. This acts as the body of your program where all logic gets inserted. For instance, the “nextInt()” method is used in the below code block to retrieve the user-inputted values on the console window:
System.out.print("Enter the First Number: ");
  int a = insertion.nextInt();
  System.out.print("Enter the Second Number: ");
  int b = insertion.nextInt();
  System.out.print("\nThe First Entered Number is: " + a);
  System.out.print("\nThe Second Entered Number is: " + b);
Step 4: Closing of Scanner Class
When there is no need for the “Scanner” class after the completion of your task, simply close its instance by applying the “close()” method. As shown below:
insertion.close();Review the Entire Code
The entire code after merging the code snippet described in the above steps looks like this:
import java.util.Scanner;
class javabeat
{
public static void main(String args[])//Defining the main method
{
  Scanner insertion = new Scanner(System.in);
  System.out.print("Enter the First Number: ");
  int a = insertion.nextInt();
  System.out.print("Enter the Second Number: ");
  int b = insertion.nextInt();
  System.out.print("\nThe First Entered Number is: " + a);
  System.out.print("\nThe Second Entered Number is: " + b);
  insertion.close();
}
}
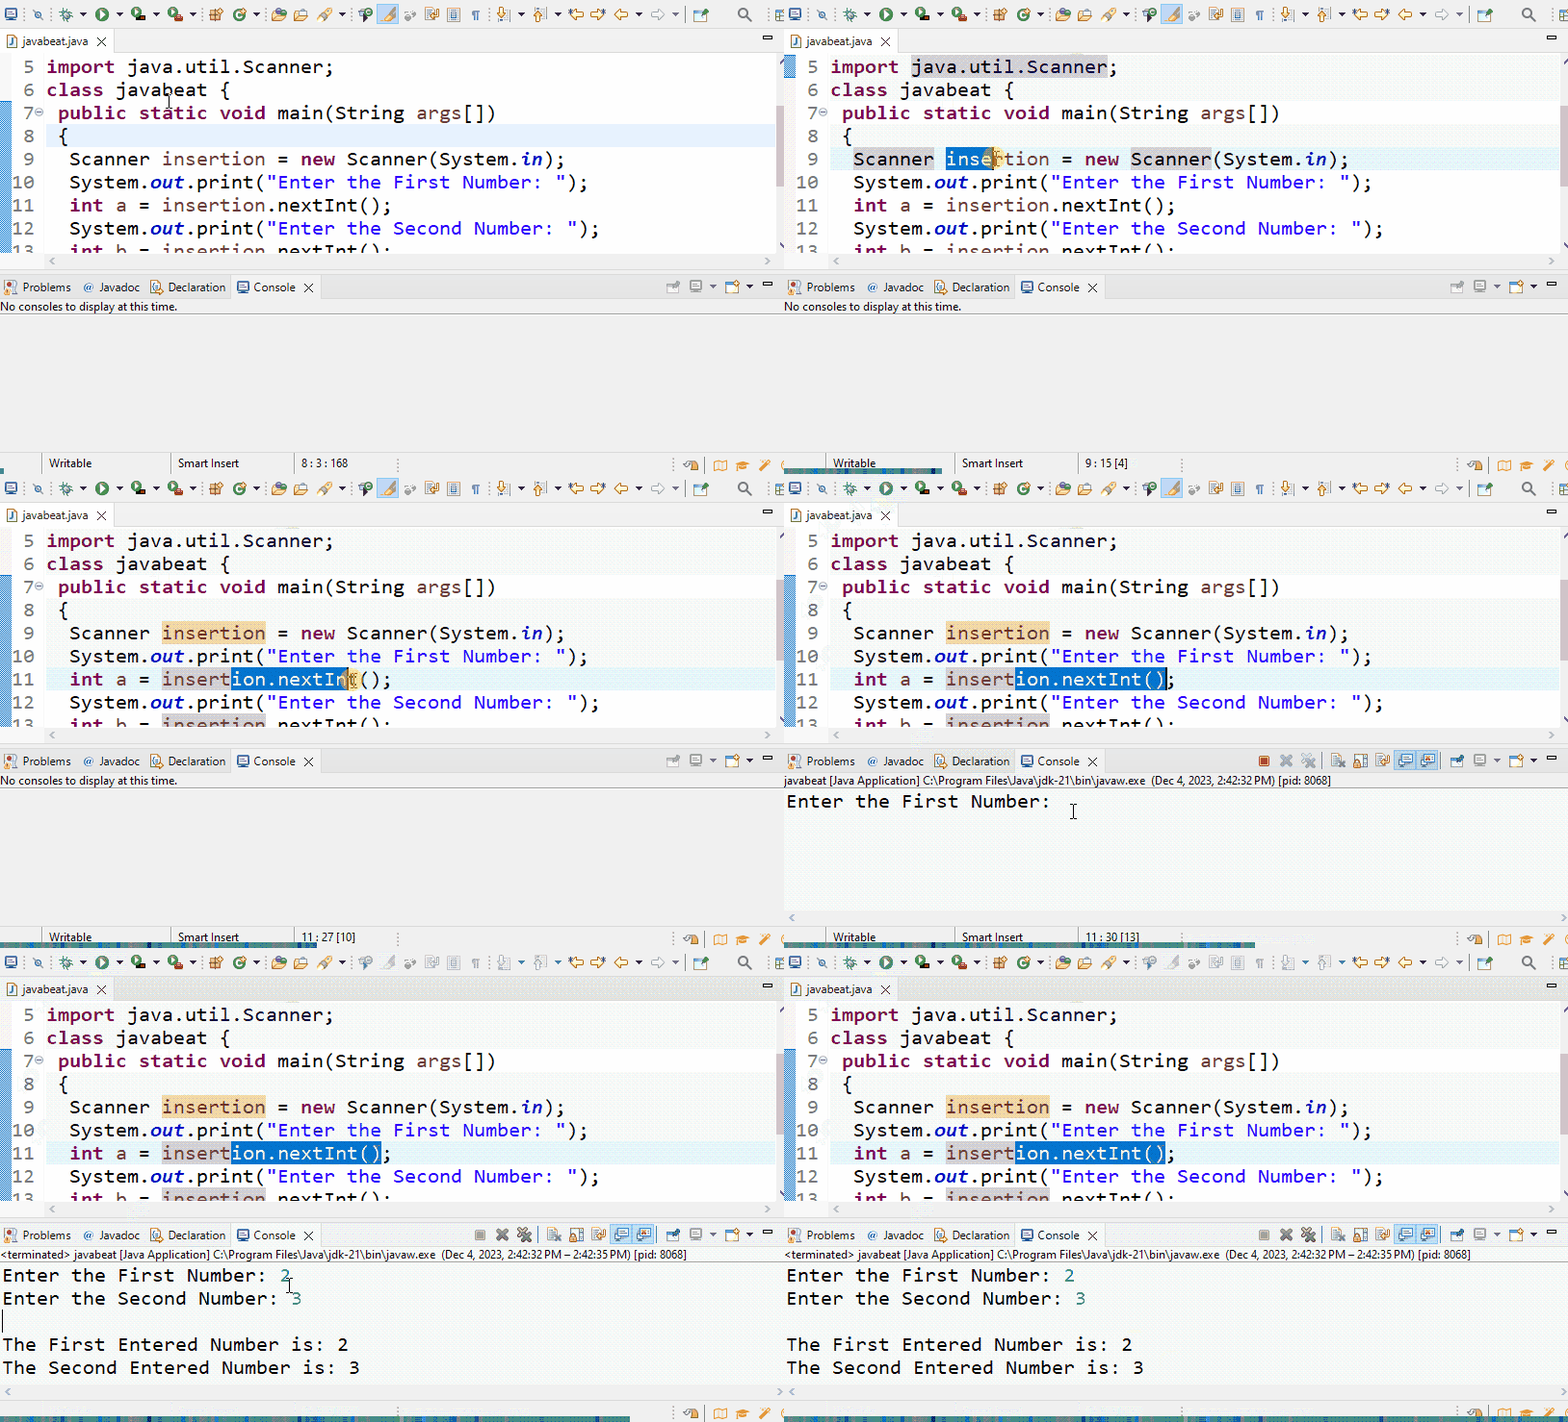
The generated output for the above code shows our input retrieval program has been created successfully:
Take a look at the below examples for the implementation of some above-described Scanner class methods.
Example 1: Use of Scanner Class “nextLine()” Method
In this example, the “nextLine()” method is used which specifically reads the “String” inserted by the user over the console window:
import java.util.Scanner;
class javabeat {//main driver method
public static void main(String args[])
{//Creating Object to Read User Entered Data
  Scanner insertion = new Scanner(System.in);
  System.out.println ( "Mention your Address: " );
  String name = insertion.nextLine();
  System.out.println ( "Your Provided Address is: " + name);
  insertion.close();
}
}
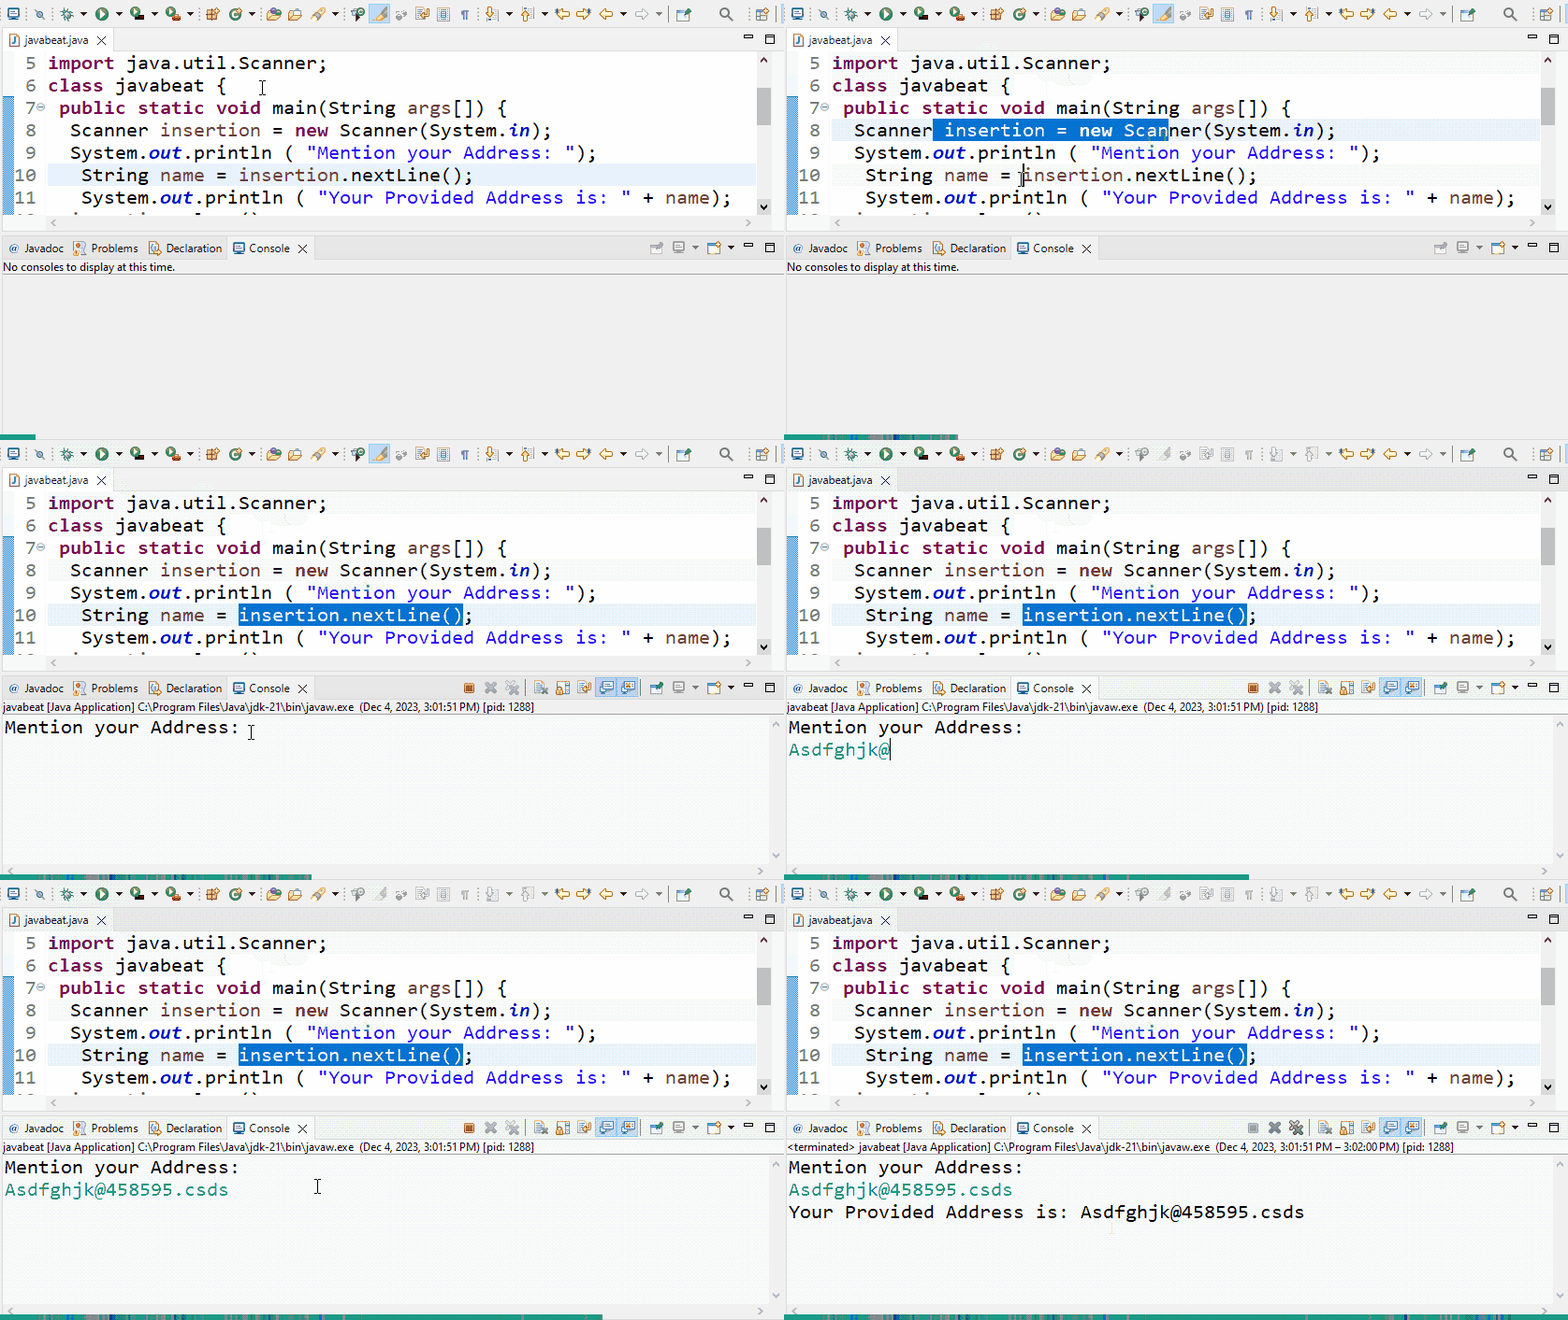
The output shows that the user-provided String has been retrieved, stored, and displayed on the console:
Example 2: Use of Scanner Class “next()” and “nextDouble()” Methods
The “next()” method of the Scanner class is used to get a single String from the user. If the user-provided String contains white spaces then only the characters residing before the first white space are considered as a String. The “nextDouble()” method retrieves and stores user data having the data type of “double”. For instance, both of the mentioned methods are being used in the below code block:
import java.util.Scanner;class javabeat {//Initializing the main driver method
public static void main(String args[]) {
  Scanner insertion = new Scanner(System.in);
  //Insertion and Retrieval of Double Type Value
  System.out.println("Enter double Value: ");
  double data = insertion.nextDouble();
  System.out.println ("nextDouble() data is: " + data);

  //Insertion and Retrieval of Single String
  System.out.println("Enter your name: ");
  String Data = insertion.next();
  System.out.println("String Data is: " + Data);

  insertion.close();
}
}
Description of the above lines of code is as follows:
- First, the “Scanner” utility is imported, and the “main()” method is defined inside the “javabeat” class.
- Inside the “main()” method a new instance for the “Scanner” class is created with the name “insertion”. The “nextDouble()” method is then attached with the “insertion” instance to store the upcoming value in double. The result of a “nextDouble()” method is stored in the double type “data” variable.
- After that, the “next()” method is applied to the “insertion” instance to get the next String from the user. The retrieved String by the “next()” method is stored in a “Data” variable which is then displayed on the console window.
- Finally, the “insertion” instance of the Scanner class is closed by applying the “close()” method.
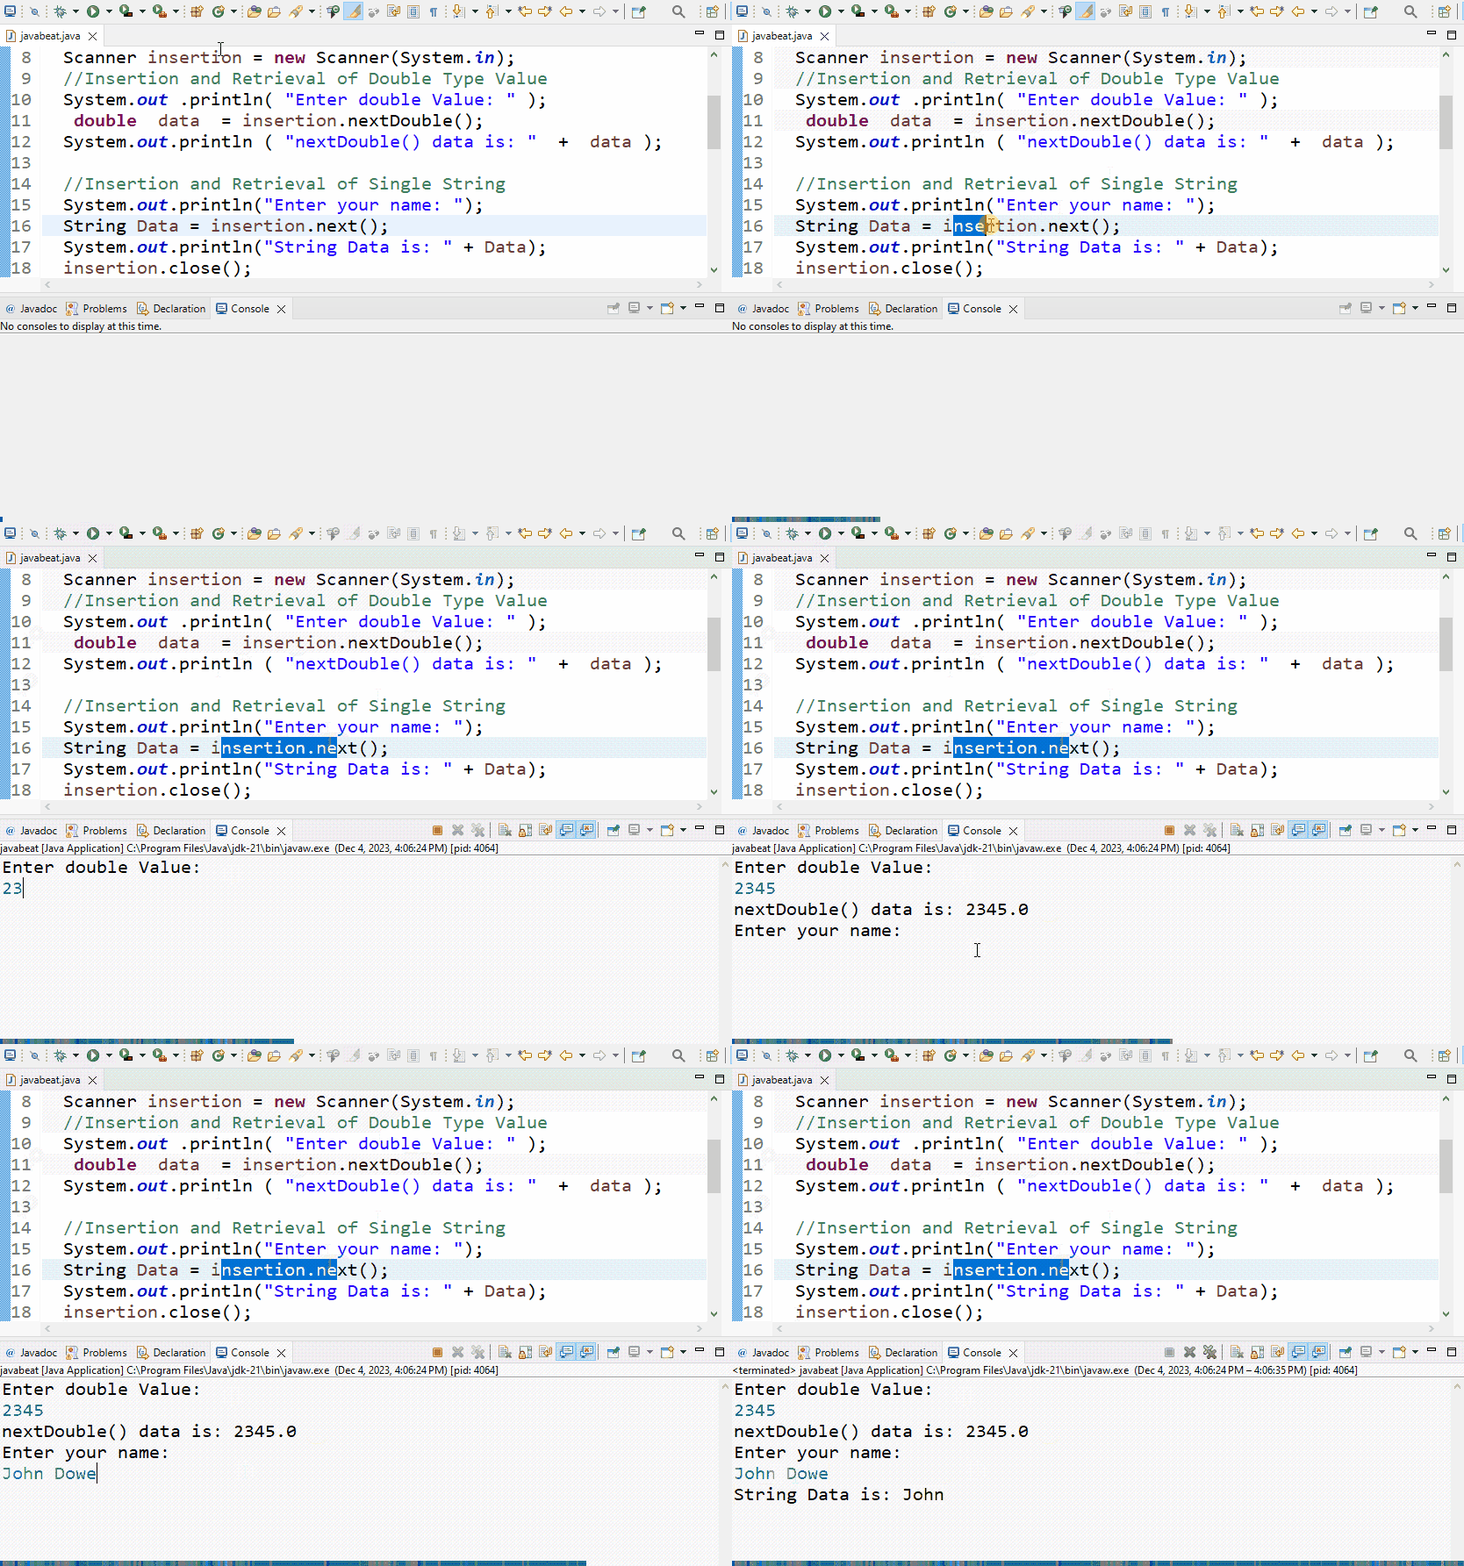
Output for the above code shows that double and String type data is retrieved and displayed on the console:
Example 3: Use of Scanner Class For String Tokenization
In this example, custom tokenization is being performed using the “Scanner” class “hasNext()” method. The tokenization is performed by breaking the whole String into multiple parts whenever a specific symbol or character appears. This process is done by using the “useDelimiter()” method, as shown in the below code snippet:
import java.util.Scanner;//Importing the Scanner packageclass javabeat {
public static void main(String args[]) {
  String demoStr = "Javabeat%Article%on%Scanner%inJava%1";
  Scanner tokenization = new Scanner(demoStr);
  tokenization.useDelimiter("%");
  tokenization.tokens();
  while (tokenization.hasNext()) {
  System.out.println(tokenization.next());
  }
  tokenization.close();
}
}
The explanation of the above code snippet is as follows:
- First, the “Scanner” utility is imported and the targeted String for tokenization is defined with the name “demoStr”.
- Next, a new object of the “Scanner” class named “tokenization” is created. In addition, the “demoStr” String is passed as the parameter for a Scanner class constructor.
- After that, apply the “useDelimiter()” with an argument of “%” and the “tokens()” methods to the “tokenization”. This will create a new token whenever the “%” symbol appears in the String “demoStr”.
- Now, use the “while” loop and “hasNext()” method to select all tokens stored in the “tokenization” object. After selecting, display them on the console.
- Finally, close the Scanner “tokenization” object by invoking the “close()” method.
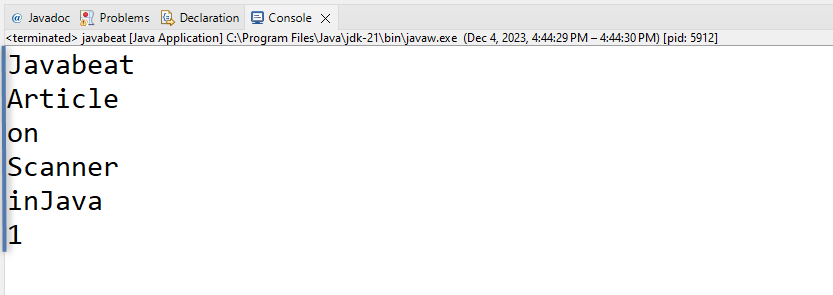
The output confirms the tokenization of String:
Example 4: Handling the BigInteger and BigDecimal Numbers Using Scanner Class
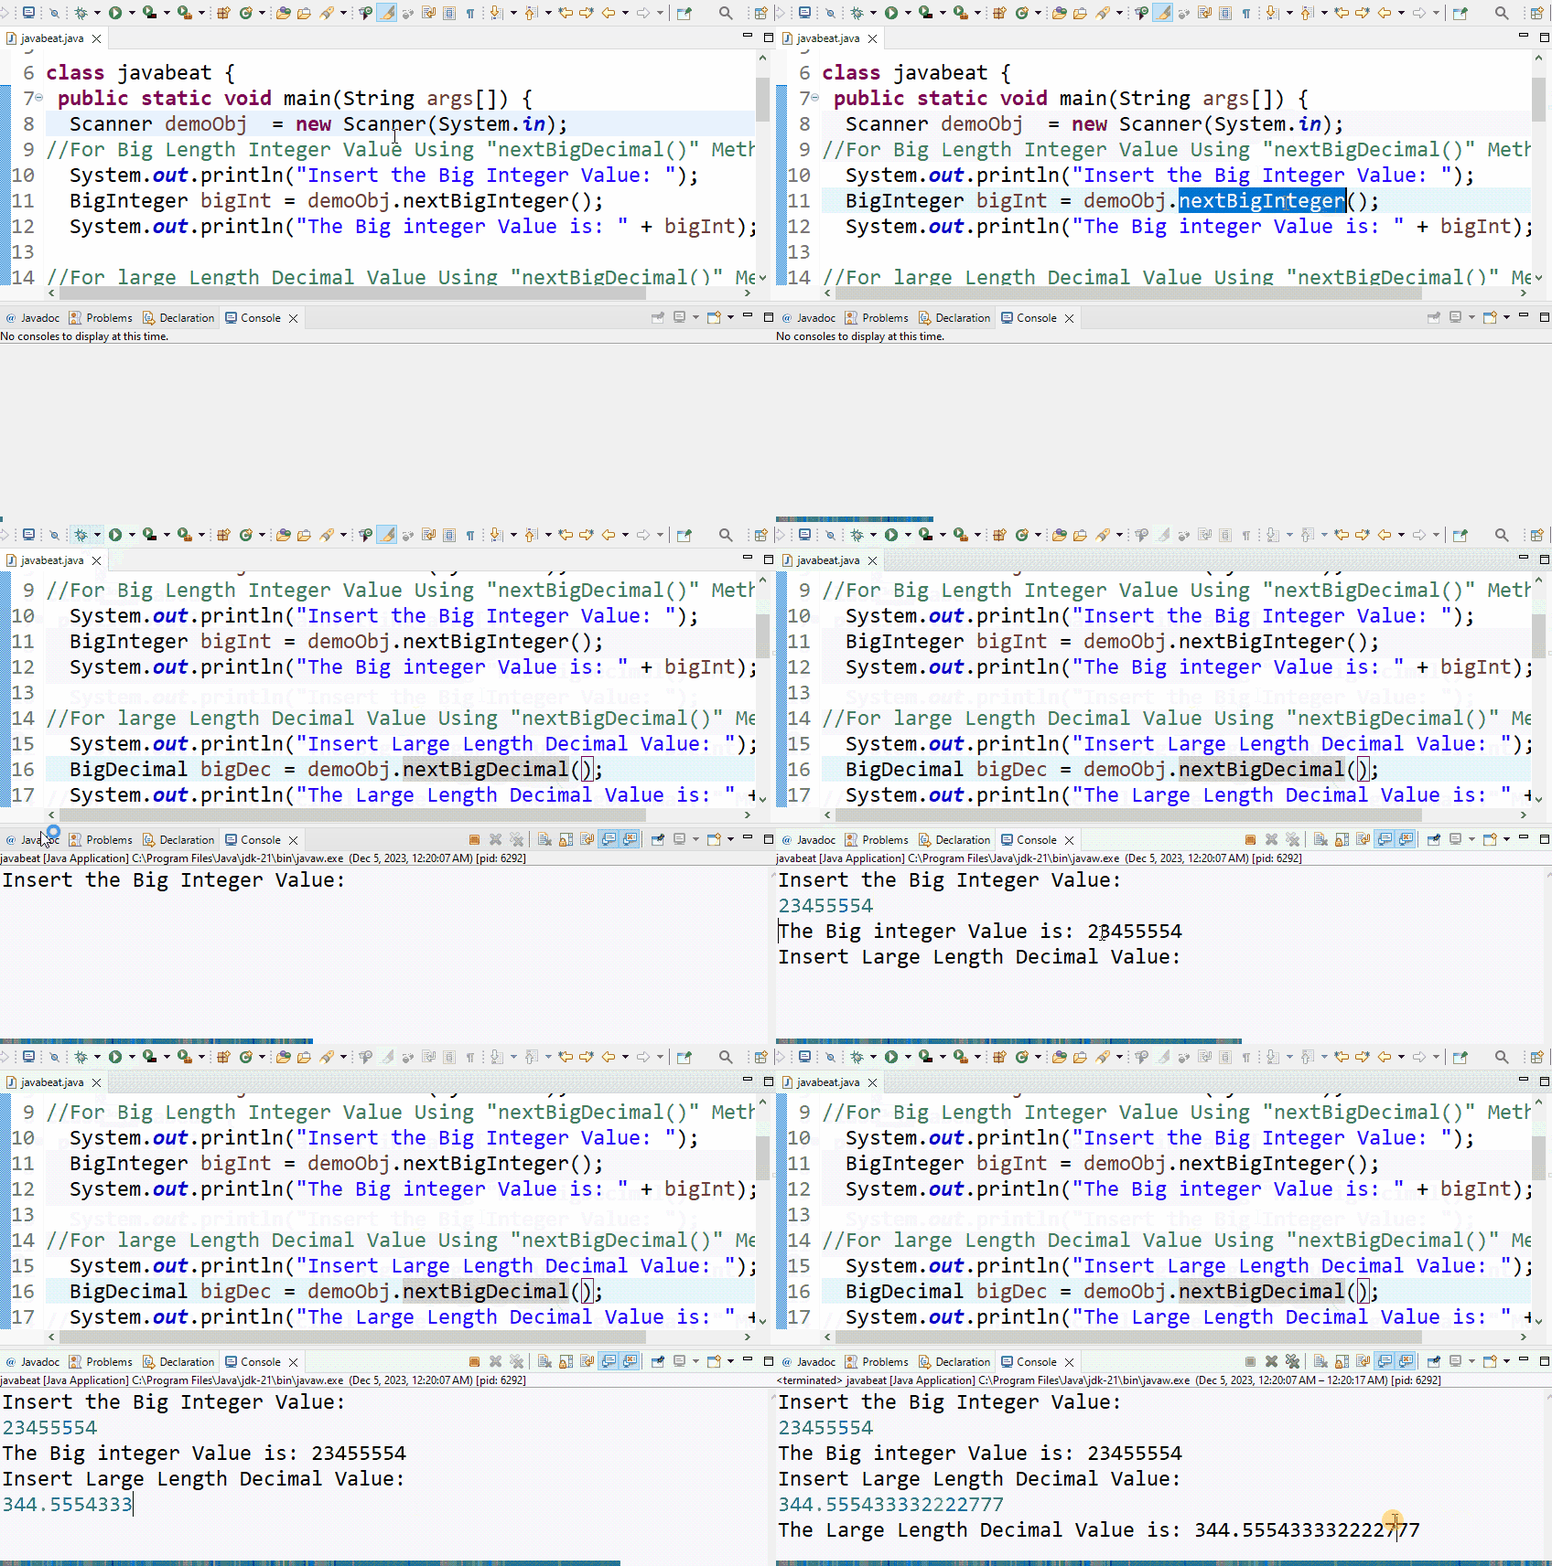
In this case, the “BigInteger” and “BigDecimal” numbers are handled by using the “nextBigInteger()” and “nextBigDecimal()” methods respectively. The values returned by these Scanner class methods are stored in the “BigInteger” and “BigDecimal” data type variables. Implementation of the discussed scenario is shown below:
import java.math.BigDecimal;
import java.math.BigInteger;
import java.util.Scanner;//Importing the Required Java Packages
class javabeat {
public static void main(String args[]) {//Setting Up Object for Further operations
Scanner demoObj = new Scanner(System.in);
//For Big Length Integer Value Using "nextBigDecimal()" Method
System.out.println("Insert the Big Integer Value: ");
BigInteger bigInt = demoObj.nextBigInteger();
System.out.println("The Big integer Value is: " + bigInt);

//For large Length Decimal Value Using "nextBigDecimal()" Method
System.out.println("Insert Large Length Decimal Value: ");
BigDecimal bigDec = demoObj.nextBigDecimal();
System.out.println("The Large Length Decimal Value is: " + bigDec);
  demoObj.close();
}
}
The working of above code is as follows:
- First, the required “math.BigDecimal”, “math.BigInteger”, and “Scanner” Java utilities are imported.
- Then, an instance of the “Scanner” class named “demoObj” is created.
- Next, the “nextBigInteger()” and “nextBigDecimal()” methods are invoked using the “demoObj” to handle the user input as a big integer and big decimal.
- The results of these methods are stored in the “bigInt” and “bigDec” variables having the data type of “BigInteger” and “BigDecimal”, respectively.
- These variables are displayed on the console for better visualization. Finally, the Scanner instance “demoObj” is terminated by invoking the “close()” method.
The generated output shows that data entered in the bigInteger and bigDecimal format are stored and displayed on the console:
Bonus Tip: Create an Array By Taking Values From User Using Scanner Class
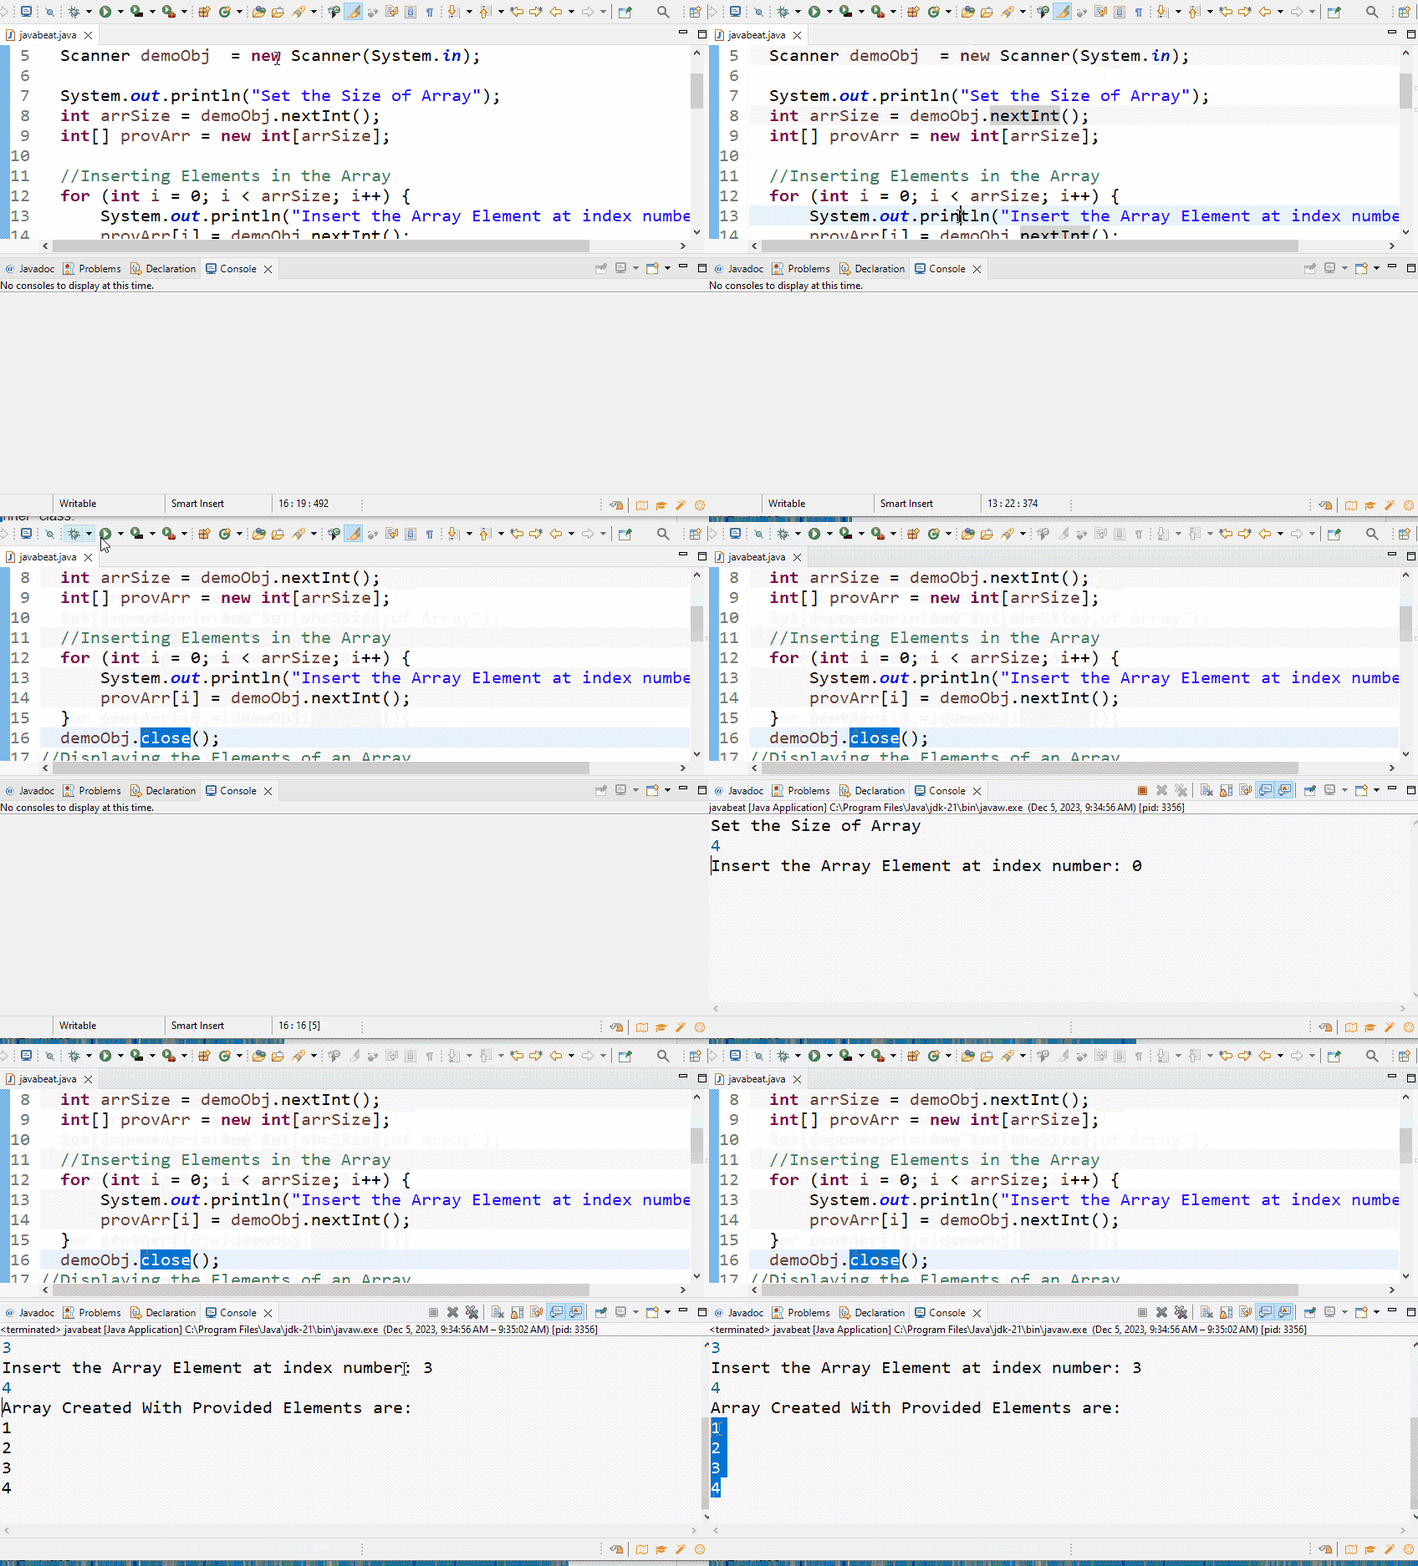
The “nextInt()” method of a Scanner class can be used along the “for” loop to insert multiple integer elements inside the array. Using the Scanner class, the user takes these elements at the run time. For instance, take a look at the provided code block:
import java.util.Scanner;
  //Importing the Required Package
class javabeat {//defining the main() method public static void main(String args[]) {
  //Setting up Object
  Scanner demoObj = new Scanner(System.in);
  System.out.println("Set the Size of Array");
  int arrSize = demoObj.nextInt();
  int[] provArr = new int[arrSize];

  //Inserting Elements in the Array
  for (int i = 0; i < arrSize; i++) {
  System.out.println("Insert the Array Element at index number: " + i);
  provArr[i] = demoObj.nextInt();
  }

  demoObj.close();
  //Displaying the Elements of an Array
  System.out.println("Array Created With Provided Elements are: ");
  for (int i = 0; i < provArr.length; i++) {
  System.out.println(provArr[i]);
  }
}
}
The working of above code is explained below:
- Java’s “Scanner” class is Imported and a custom class “javabeat” is created with the “main()” method.
- Next, an object of the “Scanner” class named “demoObj” is created which reads the data inserted by the user on the console.
- Then, the “nextInt()” method is applied on the “demoObj” instance and the result is stored in the “arrSize” variable. The “nextInt()” method checks whether the user-provided value has the data type of “int” or not.
- Also, a new “int” type array named “provArr” having a size equal to the “arrSize” is created.
- Now, the “for” loop is used to iterate over the “provArr” array, then the new user-defined values are inserted to it using the “nextInt()” method.
- Once the loop is completed, the “close()” method is applied on the “demoObj” to terminate the “Scanner” class.
- In the end, the “provArr” array is displayed containing user-provided values on the console window using the “for” loop.
The below output shows the creation of an array using the Scanner class in Java:
Alternative Approach: Use of BufferedReader Class Instead of Scanner Class
The “BufferedReader” class can be used instead of the “Scanner” class to perform the same functionality of getting data from the end-user. To use this class, import the “java.io.*” package or import the “java.io.BufferedReader”, “java.io.FileReader”, and “java.io.IOException” packages.
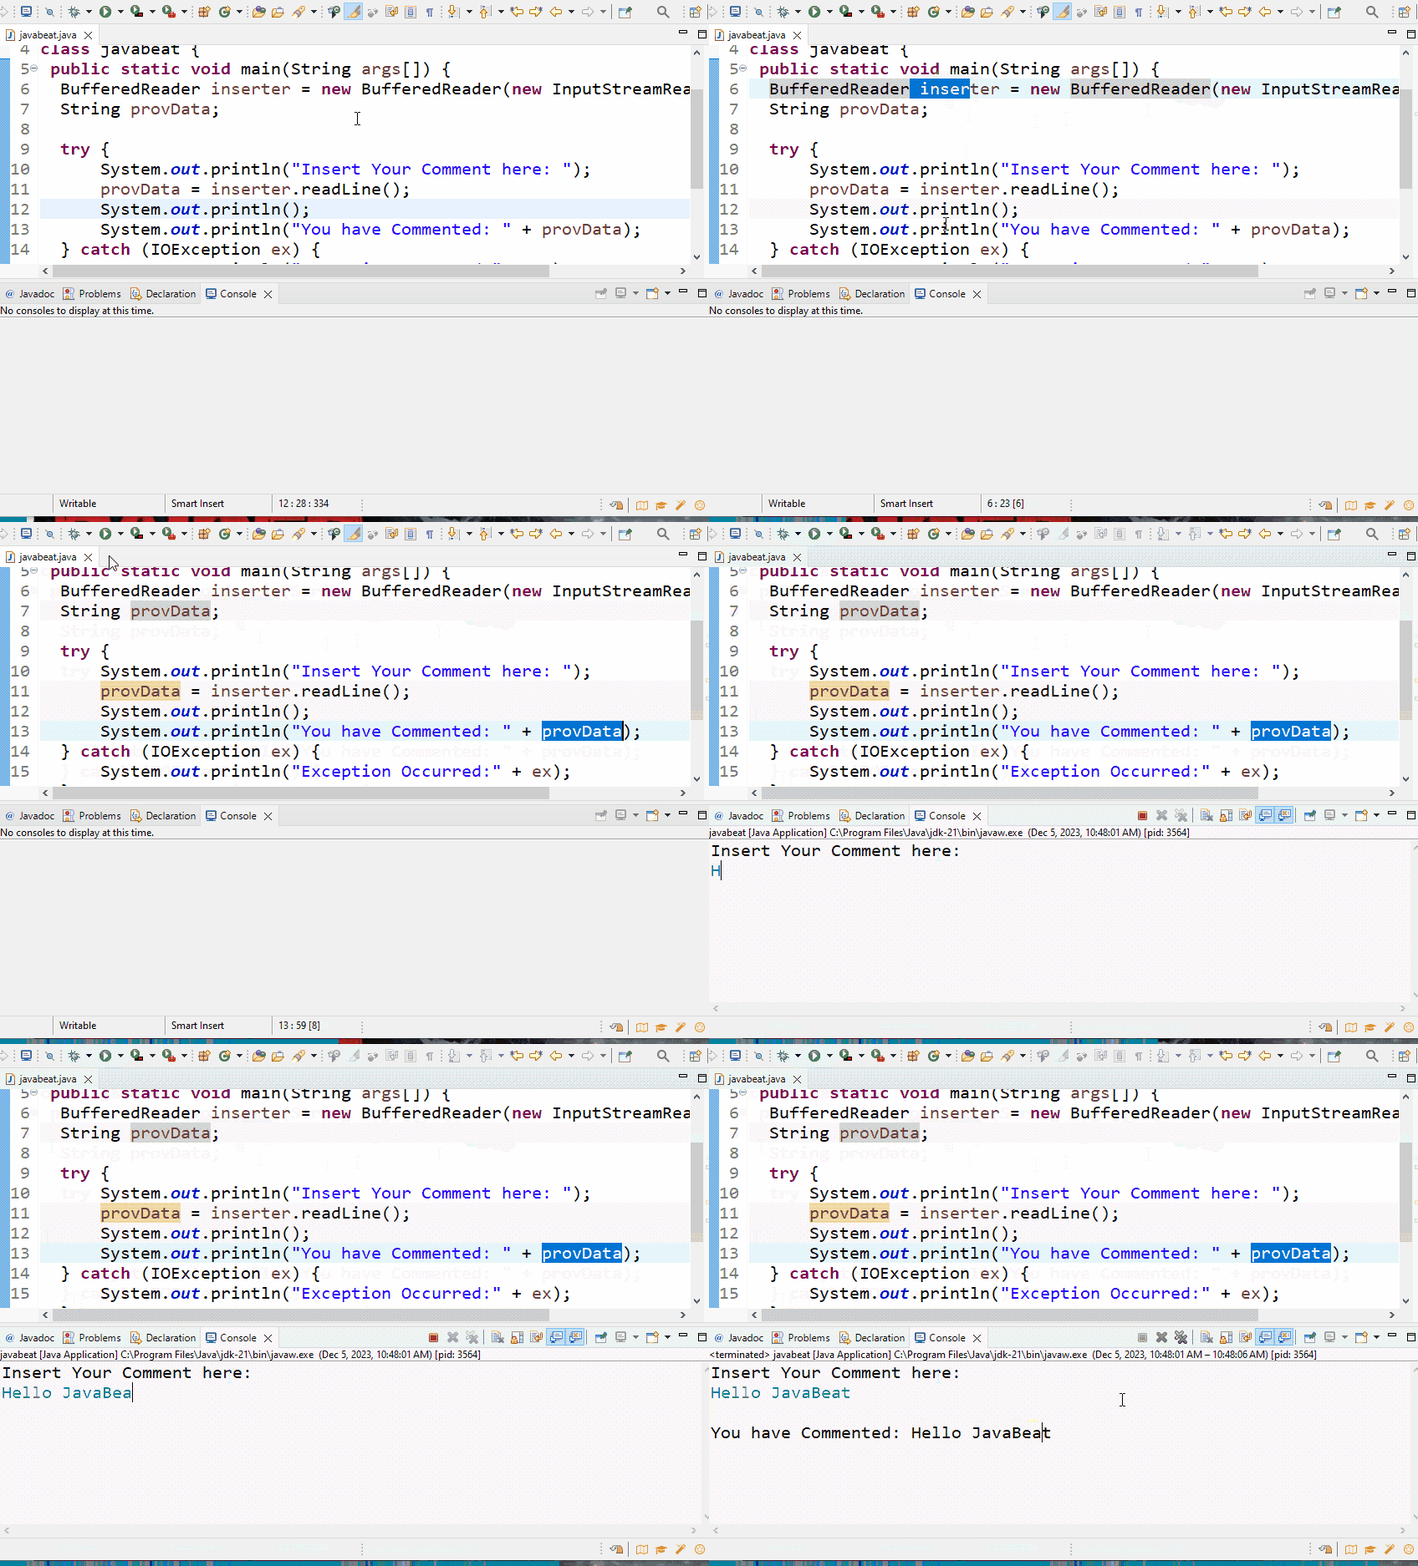
The “BufferedReader” class provides the efficient selection of Strings, Arrays, or Lists. The default size of a buffer is large enough but the user can also set the custom size for its Buffer. For instance, the working of a BufferedReader Class is shown in the below code block:
import java.io.*;
class javabeat {
public static void main(String args[]) {//Initializing the main() driver method
BufferedReader inserter = new BufferedReader(new InputStreamReader(System.in));
String provData;
try {
  System.out.println("Insert Your Comment here: ");
  provData = inserter.readLine();
  System.out.println();
  System.out.println("You have Commented: " + provData);
} catch (IOException ex) {
  System.out.println("Exception Occurred:" + ex);
  }
}
}
The above code works like this:
- Initially, the required “java.io.*” package is imported, and the class containing the “main()” method is defined.
- Next, the object “inserter” is created for the “BufferedReader” class. The instance of the “InputStreamReader” class is passed as an argument of the class constructor.
- A “String” type random variable “provData” is declared and the “try” block is utilized.
- Inside the “try” block, the “readLine()” method is applied to the “inserter” object. The result returned by this method is placed in the custom-created “provData” variable.
- Finally, the “catch” block is used to display any occurred exception related to Input/Output.
The generated output shows that user-provided data has been stored and displayed on the console:
That’s all about the usage and working of a Scanner class in Java.
Conclusion
To use the Scanner class in Java, import its “java.util.Scanner” package using the “import” keyword. Create a new object of the “Scanner” class and pass “System.in” as the class argument to allow the selection of data from the console. After that, use the methods provided by the “Scanner” class to perform operations according to the requirements. Finally, invoke the “close()” method using the Scanner class object to stop the class services. This guide has explained the usage of a Scanner class in Java.