The OFFSET() function in Google Sheets separates specific data from the original. The offset data will remain in its original cells, but have its copy to a new place or cells where we applied the OFFSET() function for this data. In this guide, we will learn how to use OFFSET() in Google Sheets in detail.
How to Use OFFSET() Function in Google Sheets
In Google Sheets, the OFFSET() function return with cells or a range of cells moved by the number of rows and column specified in the function. We use the following syntax in the OFFSET() function.
OFFSET(cell_reference, offset_rows, offset_columns, [height], [width])Where
cell_reference is the argument used in the reference to the cell or range of cells on the basis of which you want to make an offset.
offset_rows is the number of rows to be moved with the reference cell.
offset_columns is the number of columns to be moved with the reference cell.
[height] is the optional argument and is used for the height of the data range in return.
[width] is also an optional argument to be used for the width of the data range in return.
Offset rows and offset columns can be positive and negative. For positive, the number of rows down to the reference cell, and for negative, the number of rows up to the reference cell will be considered.
Similarly, for positive offset columns, the number of columns right to the reference and for negative, the number of columns, left to the reference cell will be considered.
Example 1: Offset a Single Cell Using Positive Offset Arguments
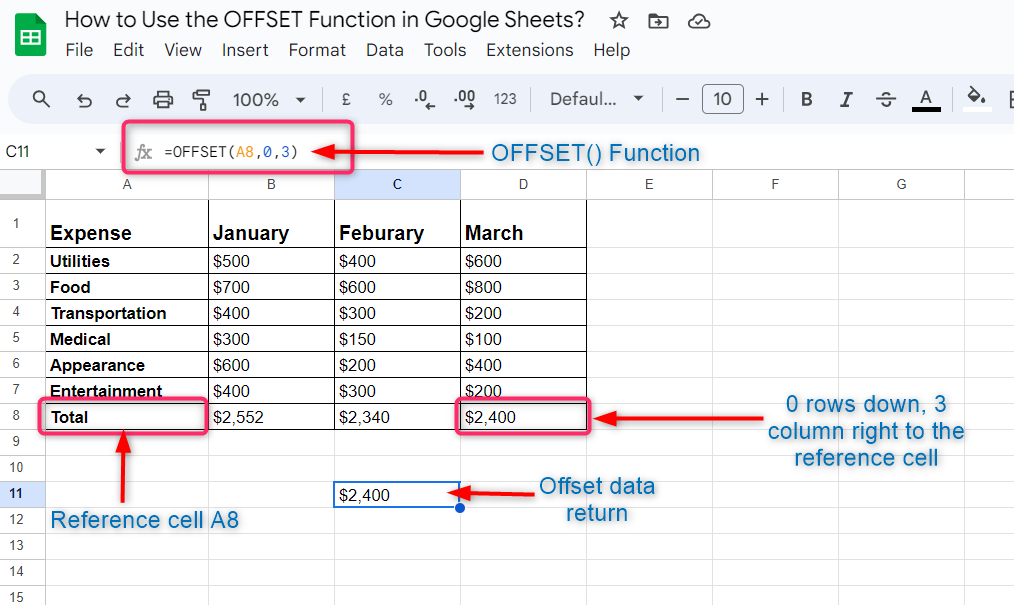
To better understand, how to use the OFFSET() function in Google Sheets, consider the following example, in which we have separated the total expenses in the month of March:

We can get the same result by changing the cell_reference argument in the OFFSET() function, but for this, we need to change the offset_rows and offset_column arguments:

Example 2: Offset a Single Cell Using Negative Offset Arguments
Now take another example in which we will use the negative values for the offset_rows and offfset_column arguments:

Example 3: Use of Width and Height Argument in OFFSET() Function
Now, we will see what happens when we use the height and width arguments in the OFFSET() function. Suppose we want to offset all the expense details made in February, we will use the number of rows as height and columns as width that contain the total data for the month of February as follows:

Similarly, if we want to offset the expense details for the months of February and March combined, we will use the same above mentioned OFFSET() function but use the width argument as 2 because the data we want to offset has lied in the 2 columns:

Example 4: Use of OFFSET() Function in Transactional Data
Transactional data is a type of data which is updated from time to time. In Google Sheets, if we add any new column or brown in the transactional data, it will never affect any result on the cells where we have used any formula. In this scenario, we use the OFFSET() function combined with the formula used in the cells.
To better understand, consider the following example, where the button right cell gives the sum of all values of the month of July from 2020 to 2022.

If we add a new column of the expense details for the year 2019. We will see, that there is no effect on the cell where we have used the SUM() function to find the total expenses in column F:

Now we use the OFFSET() function in combination with the SUM() function used in this cell to get the total of all the expenses for the month of July as follows:

Example 5: Using OFFSET() With the MATCH() Function
Sometimes, having very large data, we don’t know the reference cell address for which we want to offset some data. In this case, we use the MATCH() function to find the cell address from the cell range.
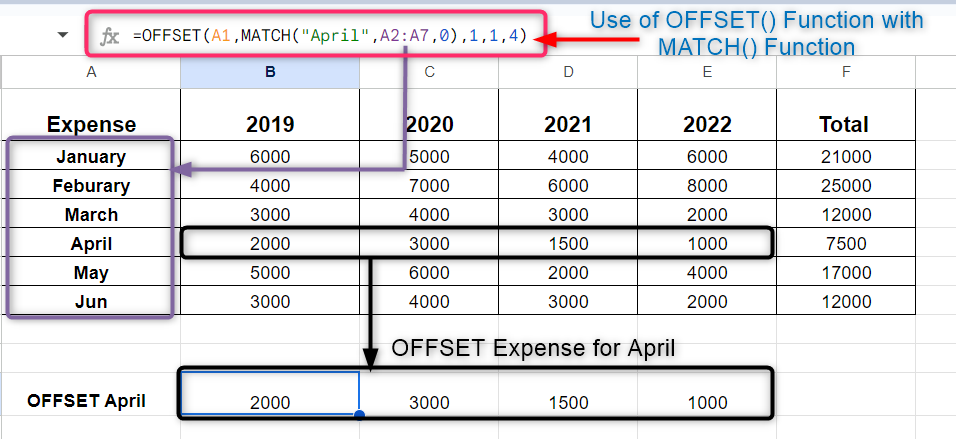
In the following example, we want to offset the data for the month of April. The MATCH function requires the search key and the one-dimensional range. The MATCH() function will match the search key in the given range. In our example, we use the search key as April and select the cell range A2:A7 in the MATCH() function.
Press Enter after inserting all the remaining arguments for the OFFSET() function as mentioned in the above examples, we will get the return data with expanse detail for the month of April as shown in the following:

Conclusion
The OFFSET() function in Google Sheets is used to make a copy of some data from the original data into another place in the same Sheets. This doesn’t affect the data in their original place.