Uptime is the time in the computer at which it remains operational. In simple words, the time in which the computer remains turned on is known as uptime. The time in which the computer remains off is known as downtime. Computer uptime is stored in Windows and keeps track of the activities performed since the last restart or reboot. Uptime is usually utilized by the system administrators to check the computer’s reliability.
Checking the computer’s uptime is a great source to see when it was turned on and how long the system has been running. Even though knowing the computer uptime is not beneficial for you. However, having the knowledge to get the computer time can help troubleshoot various Windows problems. Moreover, if you want to know when your computer was restarted last time then it could be a fun activity to know.
This article will present various methods to find the uptime of the computer.
How to View the Computer Uptime on Windows 10?
The computer uptime can be checked using both GUI (Graphical User Interface) methods and CLI (Command Line Interface) methods on Windows 10 and 11. Here is the list of methods to check the computer’s uptime:
- Method 1: Use Task Manager to Check the Computer’s Uptime
- Method 2: Use Systeminfo Command to Check the Computer Uptime
- Method 3: Use Net Statistics Command to Check the Computer Uptime
- Method 4: Use PowerShell to Check the Computer Uptime
- Method 5: Use the Control Panel to Check the Computer Uptime (Network Uptime)
- Method 6: Use System Settings to Check the Computer Uptime (Network Uptime Windows 11 Only)
Method 1: Use Task Manager to Check the Computer Uptime
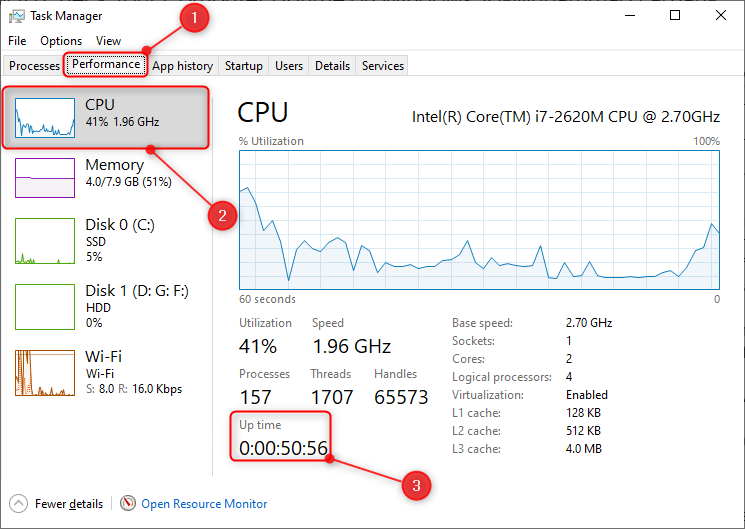
The quick and easiest way to check the computer’s up time in Windows is through the Task Manager. Task Manager application is a Microsoft Windows basic component that assists users in managing, monitoring, and troubleshooting problems. Check the mentioned steps below to check the computer’s uptime.
Step 1: Press the Ctrl+Alt+Del shortcut key and select Task Manager.
Step 2: Navigate to the Performance tab, select CPU and you can see the Up time:

Method 2: Use Systeminfo Command to Check the Computer’s Uptime
The Systeminfo command in the Command Prompt can be executed to check how long the system has been running without interruptions. This Systeminfo command provides complete information about the computer including the System Boot Time. reading the below steps will assist in checking the computer’s uptime using Command Prompt.
Step 1: Click on the Windows button to open the Start menu.
Step 2: Search Command Prompt and open it as an administrator:

Step 3: Type the Systeminfo command and hit the Enter key:

Method 3: Use Net Statistics Command to Check the Computer Uptime
The net statistics command can check the computer’s uptime in Windows 10 and 11. This command also tells about the restart time of the computer. To check the uptime of Windows workstations execute the net statistics workstation command and to check the uptime of Windows servers execute the net stats server command.
Step 1: Open Command Prompt as an administrator.
Step 2: Type the net statistics workstation command and press the Enter key:

Method 4: Use PowerShell to Check the Computer’s Uptime
PowerShell can also check the computer’s uptime in Windows 10. It will even display the last restart time of the computer in days, hours, and minutes.
Step 1: Press the Windows+X shortcut key and select Windows PowerShell:

Step 2: Type (get-date) – (gcim Win32_OperatingSystem).LastBootUpTime and press Enter key:

Method 5: Use the Control Panel to Check the Computer’s Uptime (Network Uptime)
Control Panel can be used to display the network uptime, which we can relate to the computer uptime. With the network uptime, we can only assume that the network was connected to the computer when restarted. However, this method does not guarantee whether the computer time is accurate or not.
Step 1: Open the Control Panel from the Start menu:

Step 2: Navigate to Control Panel > Network and Internet > Network and Sharing Center and select Change adapter settings:

Step 3: Open the connected network Properties:

Step 4: Check the Duration to know the up time of the computer or network:

Method 6: Use System Settings to Check the Computer’s Uptime (Network Uptime Windows 11 Only)
Windows system Settings can also help in checking the computer or network uptime. However, it will only tell us about the network uptime. We can relate the network uptime to computer time and assume the computer restart time.
Step 1: Press Windows+I to open system Settings:
Step 2: Navigate to Network & internet > Advanced network settings.
Step 3: Expand the network you are connected to.
Step 4: See the Duration to check the computer or network uptime:

Conclusion
To check the computer’s uptime on Windows, press the Ctrl+Alt+Del shortcut key and select Task Manager. Move to the Performance tab. Select CPU and you can see the Up time there. Alternatively, executing the Systeminfo command in Command Prompt will also display the computer uptime in Windows. Read the above guide to learn more methods to check the computer uptime on Windows 10 or 11 practically.