Computers are very interesting machines that intelligently interact with users. Computers can run different operating systems according to their architecture design, such as Windows, Mac, or Linux. The operating system acts as a medium between a PC and a user which allows the accomplishment of multiple tasks. Users get multiple features when they choose an operating system of their choice, however, some features are essential which are common, such as taking a screenshot.
This guide will enlighten the complete installation and usage details about snipping tools of Windows, Linux, and Mac.
- How do I Get the Snipping Tool?
- Using Snipping Tool for Capturing Screenshots
- How to Use Modes of Snipping Tools
- How to Use Delay Feature of Snipping Tool
- How to Use Options in Snipping Tools
- How do I Crop Screenshot With Snipping Tool?
- Screenshot Without Opening the Snipping Tool
- How do I Capture a Scrolling Screen With the Snipping Tool?
- How to Fix Snipping Tool Not Working in Windows 11/10?
- Taking a Screenshot on an HP Without a Snipping Tool?
- What is the Best Free Snipping/Screenshot Tool?
- What is the Best Chrome Screenshot Extension
- How to Use Mac Screenshot Tool
- Useful Shortcut for Snipping on Mac
- How to Edit an Image/Screenshot on Mac
- How to Change Screenshot Location for Saving on Mac
- How to Take Screenshots on Linux?
- How to Snip a Screenshot on Chromebook
- How to Edit Screenshots/Images in Chromebook
How to Use Snipping Tool to Capture Screenshots
Snipping tools are a great way to capture the whole screen or a specific part of the screen instantly into the computer. Snipping tools are getting more advanced day by day as they allow users not only to capture screenshots but edit them without using any separate third-party tools. For example, the Windows snipping tool gives pen tools and screenshot-sharing options right after capturing them.
How do I Get the Snipping Tool?
In each operating system, a tool to capture screenshots is already installed, however, if you do not find one, it can be installed. Consider visiting the official store of the platform to check whether the default snipping tool is available to install. Let’s implement it practically in Windows OS.
Launch the Microsoft Store from the Taskbar by clicking on its icon as shown below.

Within Microsoft store, utilize the search bar and write “snipping tool” in it. In the dropdown, Windows default Snipping tool will appear; select it.

Alternatively, click this link to go to the Snipping Tool page within the Microsoft Store platform.

Use Snipping Tool to Capture Screenshots
To open and take a screenshot from Snipping Tool on Windows 10/11, access the Windows search bar and type the snipping tool. On the appearance, choose the Snipping Tool app or click the open appear after hovering on it.

The snipping application will be launched and a small window with several options will be displayed on the screen. Click the “NEW” along with the scissor icon to initilize the process of capturing a screenshot of the screen.

Utilize your mouse’s left button to capture the area for a specific screenshot. Keep left button of mouse pressed while moving the cursor to a specific point.

Release the mouse button once all is done. Immediately, the captured part will be shown within the Snipping Tool. It’ll provide essential and some extra features to deal with the screenshot.
1. How to Save, Copy, or Share Screenshot
- Click the save icon to store the screenshot within the device’s storage
- Click the copy icon to directly paste your screenshot somewhere
- Click the email icon to share it with someone through email
2. How to Draw, Highlight, or Erase on Screenshot
- Click on the pencil/pen option to draw something on the screenshot. Hitting the dropdown located along with the pen option will allow you to customize the colors and pen line.
- Click the highlighter option to highlight text or objects with yellow color.
- Click the eraser icon to remove a line or highlighted strip from the image.
3. How to Use Paint 3D For Screenshot in Snipping Tool
Luckily there is a Paint 3D option available in the snipping tool to take the screenshot to an advanced level.
- Click on Paint 3D to open a screenshot in Paint 3D app to edit/customize it with more options.

All essential and extra features are listed in detail above, however, there is still more in the Snipping Tool which provides better control to the user, such as modes and delays.
How to Use Modes of Snipping Tools
Snipping Tool Mode delivers inevitable screen-capturing options which are
- Free-form Snip: This means no limit, simply select this option and start cutting the screen in any desired shape.
- Rectangular Snip: By default, a rectangular snip is activated which lets to snip the screen in a square or rectangular way.
- Window Snip: To capture only a specific opened window, this option is useful.
- Full-screen Snip: Selecting this option will straight away capture the whole screen.

How to Use Delay Feature of Snipping Tool
Delay is a useful option in the Snipping Tool as it allows the user a few seconds to get ready before capturing the screenshot. Whenever the New button is pressed, it sets the selected seconds delay to capture the screenshot. Simply, it gives up to 5 seconds which can be chosen as per the willingness.

Output
Here we have set the delay for 3 seconds.

How to Use Options in Snipping Tools
A gear icon with text options has Snipping Tool settings which let the user control how this application will act. Each option is self-explanatory and indicates its working appropriately.

How do I Crop Screenshot Using Snipping Tool?
To crop the screenshot, click on the Paint 3D option that can be located in the Snipping Tool top bar.

This will open up the screenshot within the Paint 3D application automatically. Next, select the “Crop” from the top to proceed further.

Now, all we have to do is:
- Use the corner points and adjust the area that needs to be cropped
- Click the crop icon from the right panel if the options related to cropping are not visible
- Press the “Done” button to make the changes

After that, hold the “Win+S” keys together to save the image. Select the appropriate location and name for the cropped screenshot and click on the “Save” button.

Screenshot Without Opening the Snipping Tool
Pressing the “Alt+Prtn Scrn” keys combined capture a window and utilizing the “Prtn Scrn” key only makes the screen fully captured without opening the snipping tool. Doing so will copy the screenshot to the Windows clipboard and now, you have to paste it somewhere. For that, launch the Windows Paint 3D application using the Windows search bar.

Choose “New” from the options.

Utilize your mouse right-click and select the “Paste” option to drop the screenshot into the page.

After pasting the screen, use the above-mentioned cropping method in the same way to get the specific part of the screenshot. Moreover, Paint 3D provides a vast range of features that can be applied to each inserted image/screenshot.

Need a more quick method? Let’s hastily move to the next section.
Alternate to Quickly Capture the Screenshot Without Opening Snipping Tool
Press “Win+Shift+S” combined from your keyboard to directly run the Windows Snip & Sketch app.

All of a sudden, the screen will get dark and the toolbar will appear on the top. All you need to do is hold the mouse left click from one point to another point to take a screenshot.

Once the pressed button is released, a dialogue box will slide from the bottom right side of the screen; simply click on it.

It will open up the screenshot in Snip & Sketch, simply click on the save button from the top right to store the screenshot in the device drive.

How do I Snip a Scrolling Screen With the Snipping Tool?
The scrolling screen can be captured within mp4 format by using the Snipping Tool on Windows 11. Windows 11 Snipping Tool works in the same way as Windows 10, however, there are some extra features in it, such as adding borders on screenshots and recording screens. So, to record the scrolling screen, follow the instructions presented in the following section.
Once the Snipping Tool is launched on Windows 11, select the record option located along with the camera icon and click on “+ New”

It will ask to select the area of the screen which you want to record. Simply use the mouse left click to assign it an area and click on the start recording button.

Scroll the screen to the preferred point and stop the recording. Now, press Ctrl+S to save the file within the device with your desired name.
How to Fix Snipping Tool Not Working in Windows 11/10?
There might be several reasons that can prevent the Snipping Tool from not working properly. Let’s walk through some fixes to get the Snipping Tool to function correctly.
- Restart the PC
Consider restarting the PC as it will wipe out the programs along with the glitches or bugs from the memory and give the PC a fresh start.

- Run Snipping Tool as Administrator
Running a program by clicking on the option “Run as administrator” ensures that the program has all the privileges to do anything within the computer. So, launch the Snipping Tool in this way and give it a try.

- Check Windows Update
Press “Win+i” from the keyboard to open settings, select the “Update & Security” option, and click on the “Check for updates” button. Next, consider restarting the computer after the date and try using the snipping tool.

- Terminate Other Screenshots or Screen Recording Tools
If any other third-party tools are running when trying to use the Windows Snipping Tool, there might be interference or conflict between tools processes. So, stop the tools forcibly using the Task Manager or from Windows hidden icons.

- Reset/Repair Snipping Tool
Resetting an app clears all cached data and takes it back into its default settings. This could be helpful if an app is glitching or not launching on the computer. To reset/repair the Snipping Tool, go into Settings, Apps, and Apps & features; now search for Snipping Tool, open the advance option by tapping three vertical dots, and scroll to select the option:
- Repair: It will not remove your current settings and try to fix the Snipping Tool errors
- Reset: It will remove all your data or current setting and fix the Snipping Tool

How to Screenshot on an HP Without a Snipping Tool?
To screenshot on HP laptops or PCs without a Snipping Tool, we can utilize the Xbox Game Bar which is installed along with the Windows installation and setup. To activate the Windows Game Bar, utilize the keys “Win+G” on the desired screen and press the camera icon button to take the screenshot.

A notification from the screen left will slide in to inform that the screenshot is saved. Click on it to open the gallery where the screenshots can be seen.

In the left panel, all the screenshots with the date & time formatted name are placed. Selecting any screenshot will list additional details and multiple options, such as opening the file location and deleting the screenshot.

What is the Best Free Snipping/Screenshot Tool?
The internet is filled with plenty of third-party snipping tools. You can find from classic to advanced level snipping tools that are user-friendly, enhancing the experience and providing ease of access. You can utilize the below-listed snipping tools for your operating system.
Free Best Screenshot Tools for Windows
- Screenpresso
- Screenshot
- Lightshot
- Flameshot
- ShareX
Free Best Screenshot Tools for Mac
- Markup Hero
- Flameshot
- Lightshot
- Greenshot
Free Best Screenshot Tools for Linux
To learn about the best Linux snipping tools, read this guide which describes each tool’s details and installation method respectively.
What is the Best Chrome Screenshot Extension
Chrome is a popular browser that is widely used by the majority of users. It provides a store (Chrome Web Store) to extend the functionality for performing different tasks. A lot of web applications can be found in this store that can be seamlessly integrated into the browser to fulfill multiple daily tasks, such as translating text or capturing screenshots.
To take screenshots in Chrome, here is the list of best screenshot extensions that can be used.
- Scrnli
- Awesome Screenshot
- CaptureCast
- GoFullPage
- Screenshot Easy
- Handy Screenshot
- Fast Screenshot
How to Use Mac Screenshot Tool
Macintosh are popular for their friendly-user environment with many awesome usability features. MacOS provides a built-in snipping tool to play inside the screen. In order to use the Mac screenshot tool, press the “cmd+shift+5” button to make screenshot-related toolbars appear on the screen.

The above-shown toolbar provides the following options to capture a screen
- Capture full screen
- Capture only window
- Capture only a portion
- Record only a portion
- Record all screens
Useful Shortcut for Snipping on Mac
Mac snipping tool can be used with different shortcuts which are:
cmd+shift+3: This will capture the whole screen on the Mac directly
cmd+shift+4: It allows you to get the specific part of the screen as per your need
cmd+shift+4+spacebar: Capture only an opened menu or window
ctrl+cmd+shift+3 or 4: Screenshot will not save into any folder and get copied to clipboard instead
cmd+shift+6 (only for pro models with Touch bar): Takes the screenshot of Mac’s touch bar.
How to Edit an Image/Screenshot on Mac
Whenever the screenshot is captured, a tiny overview of it is shown in the right bottom corner of the screen for a few seconds. Simply selecting it opens the screenshot in its snipping tool editor where multiple options can be found.

From the top right, hitting the pen/pencil icon within a round circle lists more options within its bar in a horizontal way.

These options can be used according to the need to make additions or adjustments within the snipped screenshot. These options are:
- Sketch: Draw a custom shape on your image by selecting this option and then play with it by filling it with colors and other different things.
- Draw: Make any shape and color line on the screenshot
- Shapes: Add shapes on your screenshot, such as circle, square, or rectangle
- Text: Add custom text on your screenshot
- Pencil: Utilize a pencil to write or draw anything on the image
- Signature: Add signature on the image
- Line Style: Control the thickness of lines or shapes with this option
- Font Size: Control the size of text using this option
- Rotate: Rotate your screenshot in any direction
- Crop: Crop the screenshot
- Description: Add a description in your screenshot

How to Change Screenshot Location for Saving on Mac
By default, Mac screenshots are saved on the desktop with the name of screenshots formatted in date and time. So, to change the screenshot location for saving screenshots on Mac, click the “Options” button and select “Other Location…”

Choose the directory according to your willingness and hit the “Choose” button.

Now, all the screenshots will be saved in that directory which is selected.
How to Take Screenshots on Linux?
To take screenshots on Linux, we can either utilize the built-in GUI application or third-party tools. Here, this article lists all the possible shortcut keys and suitable ways to take screenshots on Linux devices.
How to Take a Screenshot on Chromebook
To take a screenshot on Chromebook, utilize its built-in snipping tool by pressing the button “Ctrl+Shift+Show” key at the same time.

This will make the screen color dull and start showing a toolbar. Simply utilize your cursor to capture the required area screenshot.

You can also open the Chromebook menu from the bottom right and click on “Screen capture” to directly take an entire screen screenshot.

Screenshot will automatically get copied to the clipboard. A slider from the left corner of the screen will also appear with a small view of the captured screenshot providing options to “Edit” or “Delete” it.
How to Edit Screenshots/Images in Chromebook
To edit the screenshot within Chromebook, you can directly press the “Edit” button right after taking the screenshot.
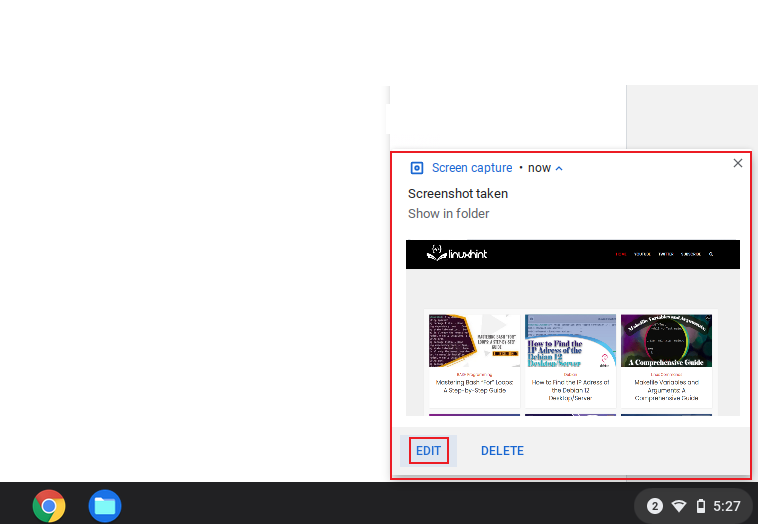
This will open in the editing window and provide a limited option at the top, such as:
- Crop
- Rescale
- Lightning filters
- Pen tool
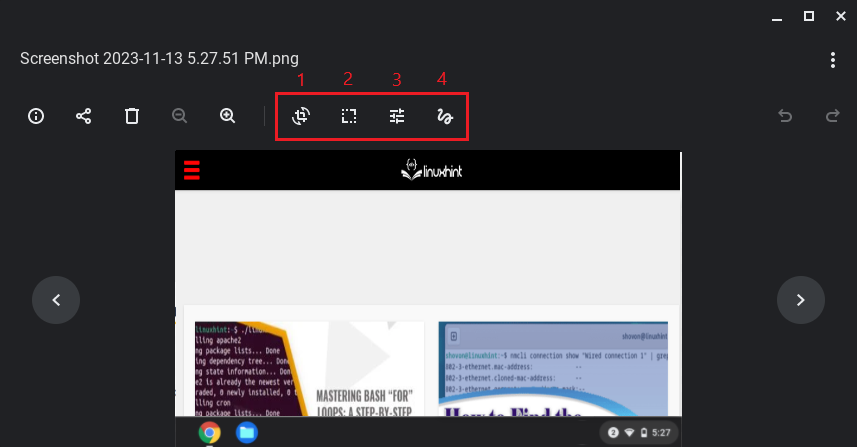
1. Crop
This will allow you to manually or automatically crop the image according to your desired aspect ratio.
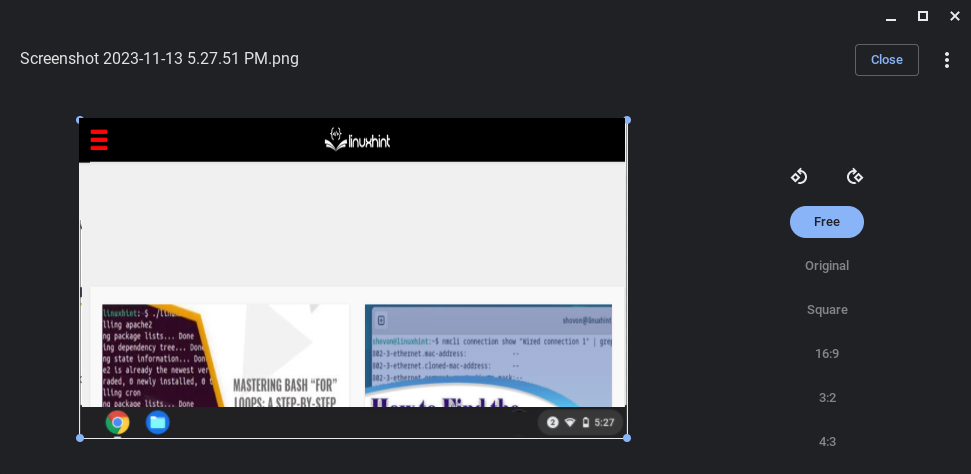
2. Rescale
Rescaling is a great way to transform the width or height of an image according to your willing size. By default, width and height are locked and directly proportional to each other, which means changing the width will adjust the height itself to avoid stretching or squeezing the screenshot.
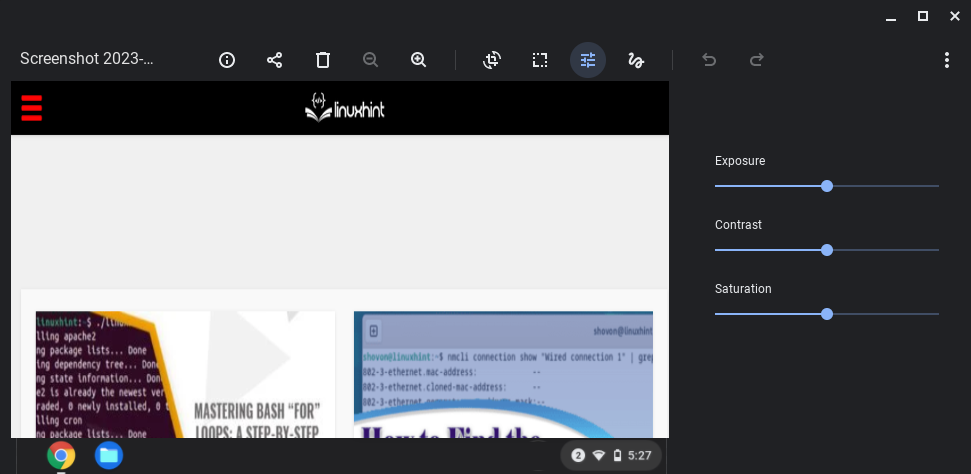
3. Lighting Filter
To control the light effects on the screenshot, the lighting filter option provides these options:
- Exposure
- Contrast
- Saturation
All these options can make an image look rough or sharp depending on the settings.
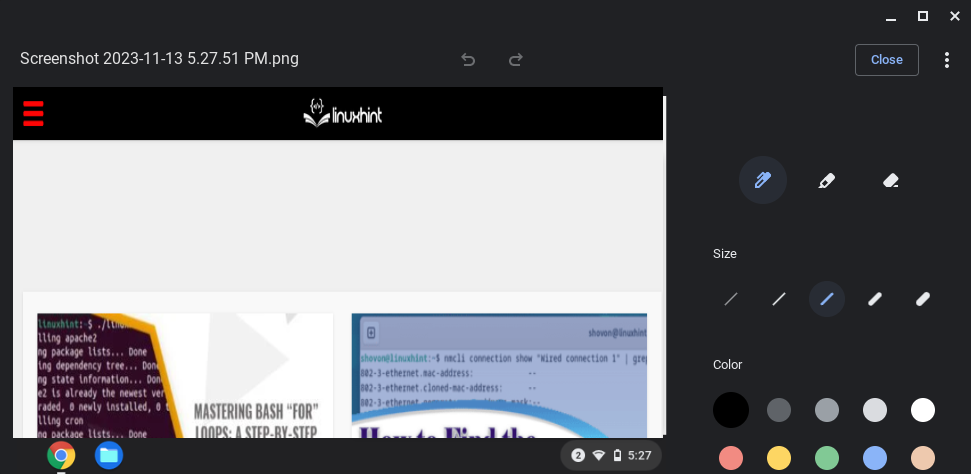
4. Pen Tool
To draw or highlight anything quickly on the snipped screen, the Chromebook pen tool works like a charm. It assists in doing so with multiple color options with slickness and smoothness.
We have covered descriptively how screenshots can be taken on computers with the assistance of a snipping tool. Moreover, cropping and other cases are also presented with proper explanations.
Conclusion
Built-in snipping tools are provided by the operating system to capture screenshots within the premises of the screen. However, a few third-party tools are also available giving superb features for every OS, such as Mac, Linux, and Windows. Taking a screenshot on a PC is easy as all you need to do is open the snipping tool and select a relevant option related to capture as per your preference. This blog has shown how Windows, Mac, and Linux snipping (screenshot) tools are used to capture the screen. Moreover, this well-organized documentation also describes the way to capture the screen on a Chromebook.