In PyTorch, tensors are essential data structures that can have multiple dimensions. Sometimes, users may want to add extra padding to the 3D or 4D tensors for various reasons, such as maximizing the batch to the largest dimension value and filling each space with the specific padding value. PyTorch provides a “torch.nn.ConstantPad2D()” method to apply the desired padding on the input tensors. Users can apply the same or different padding sizes to all sides of the tensor.
This guide will explain the method to pad the tensor boundaries with a particular value in PyTorch.
How to Pad Tensor Boundaries With a Specific Value in PyTorch?
To pad tensor boundaries with a particular value in PyTorch, follow the below-listed steps:
- Import required libraries
- Create and print input tensor
- Define padding for tensor using the “torch.nn.ConstantPad2d()” method
- Apply padding to input tensor
- Display the padded tensor
Check out the below-provides examples for a practical demonstration:
Example 1: Pad All Sides of the Tensor With the Same Padding Size
In the first section, we will define a 3D tensor and apply the same padding size to all sides.
Step 1: Install Necessary Libraries
First, install the “torch” library and “torch.nn” module that will be utilized to pad the tensor boundaries:
import torch
import torch.nn as nn
Step 2: Define Input Tensor
Then, define the input tensor and display its elements. For example, we are creating a simple 3D tensor “input_tens” via the “torch.tensor()” function:
input_tens = torch.tensor([[[ 1, 2],[ 3, 4]]])

print(input_tens)
By doing so, the 3D tensor has been created:

Step 3: Define Padding for Tensor
Next, utilize the “torch.nn.ConstantPad2d(<padding>, <value>)” method to define the padding size and constant value for the tensor. Here, we are specifying the same padding size i.e. “2” and the constant value “8” to pad the tensor boundaries:
pad = nn.ConstantPad2d(2, 8)
Step 4: Apply Padding to Input Tensor
Now, apply the above-defined padding to the input tensor “input_tens”:
| Padded_tens= pad(input_tens) |

Step 5: Print Padded Tensor
Finally, display the padded tensor to view its elements:
print(Padded_tens)The below output indicates that the input tensor has been successfully padded with the specified padding size and value:

Example 2: Pad All Sides of the Tensor With Different Padding Sizes
In the second section, we will define a 4D tensor and apply different padding sizes to all sides.
Step 1: Install Necessary Libraries
First, install the “torch” library and “torch.nn” module to pad the tensor boundaries:
import torch
import torch.nn as nn
Step 2: Define Input Tensor
After that, define the desired input tensor and display its elements. Here, we are defining a 4D tensor “input_tens” by utilizing the “torch.tensor()” function:
input_tens = torch.tensor([[[[ 1, 2],[ 3, 4]],
                          [[ 5, 6],[ 7, 8]]]])

print(input_tens)
This has created the 4D tensor:

Step 3: Define Padding for Tensor
After that, define the padding size and constant value for the tensor using the “torch.nn.ConstantPad2d(<padding>, <value>)” method. Here, we are specifying the different padding sizes i.e. “1” for the left side, “2” for the right side, “3” for the top boundary, “4” for the bottom side, and the constant value “99”:
pad = nn.ConstantPad2d((1, 2, 3, 4), 99)
Alternatively, users can also define the padding size and constant values separately and then use them in the “torch.nn.ConstantPad2d()” method:
padding = (1,2,3,4)
value = 99
pad = nn.ConstantPad2d(padding,value)
Step 4: Apply Padding to Input Tensor
Now, apply the above-defined padding to the input tensor “input_tens”:
padded_tens = pad(input_tens)
Step 5: Print Padded Tensor
Finally, display the padded tensor for verification:
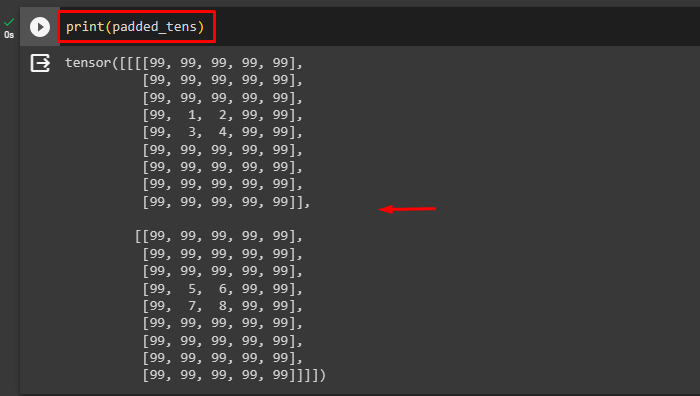
print(padded_tens)In the below output, it can be observed that the input tensor has been successfully padded with the different padding sizes and the constant value “99”:

We have efficiently explained the method to pad the 3D and 4D tensor boundaries with a particular value in PyTorch.
Note: Click on the provided link to access our Google Colab Notebook.
Final Thoughts
To pad the PyTorch tensor boundaries with a particular value, first, install the required torch libraries. Then, create a desired 3D or 4D tensor and print its elements. After that, use the “torch.nn.ConstantPad2d(<padding>, <value>)” method to define and apply the padding size and constant value to the tensor. Finally, print the padded tensor. This guide has explained the method to pad the tensor boundaries with a specific value in PyTorch.