Any operating system should have a rescue CD, DVD, USB or download that’s available, just in case the worst happens. Everyone knows that Windows and Linux systems can fail and crash so completely that there’s seemingly not much the user can do to resuscitate them.
That doesn’t mean that all hope is lost, though.
Rescutux is a product from GNU/Linux that’s designed to bring an apparently-dead operating system back to life. It’s not exactly a “reinstall” CD, but more of a companion utility that is handy for when the unexpected happens.
It features an array of tools and works in live mode to cover a wide range of issues that crop up in Linux and even in Windows. While many of the tools for rescuing a “broken” OS can be daunting to use, Rescatux is pretty straightforward. Right away, it launches Rescapp, a window that can be used to address problems with a series of categorized icons and buttons.
Rescutux can be downloaded here.
From there, the best approach is to burn it onto a CD-ROM or USB, making sure that it’s burned as an image and NOT a file. When you insert the media, your machine should do Rescutux autodetect, by default. Press return – if you don’t press return, it should be autoselected anyway inside of 60 seconds time.
Getting Started with Rescutux
The first step you’ll want to take on with Rescutux is a password reset. This is a solution that will work for XP, Vista or Windows 7. You’ll see a button on the main window that corresponds to this particular action – press it and you’ll see detailed instructions and prompts on how to do the reset.
When you’re ready, just press the “Run” button at the top of the window.
If the problem you’re having originates on your Linux partition, Rescutux can help that as well. Select the partition in the system that’s giving you problems, and then just select which user you want to designate and set a new password.
Booting USB Via Yumi
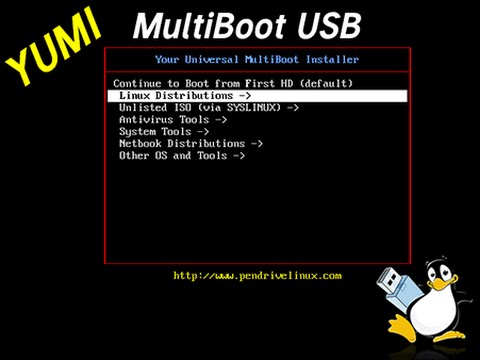
Booting via YUMI by default will boot onto the machine’s first hard disk. When you see the YUMI MultiBoot USB screen, select Linux Distributions using the down arrow key, then the return key. From there, you should see Linux Distribution screens – again, use the down arrow key and return key to arrive at the Rescatux entry. You should then see the Rescutux ISOlinux screen.
Use this default entry: Live (amd64).
Should you see this message:
This kernel requires an x86-64 CPU, but only detected an i686 CPU. Unable to boot – please use a kernel appropriate for your CPU
Go ahead and repeat all these steps to be able to boot into your device, but select the Live (486) entry instead.
Grub Menu Issues
When a filesystem has errors, there are several things that can go wrong, sometimes unpredictably so. Sometimes Grub1 or Grub2 can’t locate its own files (which will show as Grub errors) or the kernels (which are “cannot find file” errors).
You may encounter situations where the kernel can be loaded, but the initrd stage can’t find the final device root filesystem. These are options to fix filesystem errors, even when a filesystem at least seems to be clean and OK.
Here are a couple of methods to rescue Grub, if you’re seeing a black screen with the message “Unknown Filesystem” and “Grub Rescue”:
- Type IS and hit Enter
- You’ll see several partitions that are in use on your PC, such as hd0,msdos1 or hd0,msdos2. Click on the partition where your Linux distro is installed.
- You’ll be asked which is the Gnu/Linux partition on your machine. Select the Gnu/Linux distro partition and ignore the Loop1 partition,
- If your distro is installed in the second option, enter this command: setprefix=(hd0,msdos1)/boot/grub. If you can’t remember or don’t know which partition, use this command with every option. You’ll see either an error message or you’ll be able to proceed.
- Once you’ve found the drive, enter: insmod normal and then normal.
- Your laptop should now reboot and take you to the desktop. Enter Ctrl+Alt+T and open terminal, then enter sudo update-grub followed by sudo grub-install/dev/sda. You might be asked for your password next – type it in, even though the password may remain invisible while you type it.
- If Grub files are lost, the system will ask for a data connection in order to download them.
Now, here’s another method for recovering Grub:
- Get a live USB stick and plug it in.
- After booting up into the live desktop, open terminal.
- Type /mnt and boot to /mnt/boot, then hit Enter to mount the root partition.
- You should be able to replace /dev/sda with the correct partition at this point.
- Type sudo update-grub to update Grub (this can take some time).
Now, if all else fails:
- Get a Windows OS installation DVD – not a Windows XP or Windows Vista DVD.
- Launch it in the PC or laptop and run the installer, either by going into boot order in the bootloader or just by pressing F12.
- When the Windows files are loaded, you should see a dialog box with “Repair your Computer.” Select this button.
- If prompted, in system recovery mode, select OS. Now enter the command bootrec/fixboot.
- Quit setup and reboot the machine. At this point, Windows is restored, and Linux distro is present, but Grub has been overridden.
How to Set Partitions
You’ll find an “Expert Tools” section in the Rescutux window, with the “Gparted” tool residing in it. You can reconfigure the partitions the tool has detected this way.
Just right-click on the partition/disk that you will be reconfiguring, which will next display a set of options that includes format partition, resize, delete, etc.
Ordering Your Hard Disks
If your machine has more than one hard disk, you’ll be asked to select and order the hard disk, in boot order that parallels the BIOS boot order. This way, Grub knows if it’s booting from a secondary device or from the first device to boot.
- Wait for Rescapp to finish. You may see a message while Rescapp is performing its assigned task, which can take some time. Be patient and wait until the process is finished.
- You should see a message saying everything went OK, or “something went wrong.”
- If you see a message that the procedure went wrong, click on the Chat button up at the top right corner of Rescapp and you can ask for help. You may be asked to share your logs via the Share Log button.
- When engaging in Chat, remember that the wait times for replies may be fairly long. Rescatux is funded by donations, and the money for a well-staffed support just isn’t there. If you’re still having problems, you can ask someone knowledgeable by forum or mailing list.
How to Restore Files
There’s a command line tool that enables users to find any files that were accidentally deleted in a partition. This is one of the more esoteric features of Rescutux, but it can be executed through the “Expert Tools” using the button named “Photorec.”
You will see a partition where files were located – just select the filesystem type you want and press “c” to start the search for deleted files. Please note this only works on HDD partitions – any files located in SSD partitions cannot be rescued using the Photorec features.
Support Features for Rescatux
One of the unique features of Rescutux and its wizard is the suite of support features that are available.
- Chat: Having trouble? You can go directly to a Rescutux channel and open the chat feature to ask for help directly.
- Share log: Each option or procedure will have its action registry stored as a log which you can share in the chat for better help and a better handle on what’s going on. Better still, users can help identify, debug and fix any Rescutux bugs that are encountered, on the fly.
- Share log on forum: There’s also a feature where you can copy and paste your logs into the forum of your choice. The logs are in forum post-alike text, complete with code symbols.
- Boot info script: You can share your computer configuration and boot script by running Boot Info Script option.
Wrapping Up on Rescutux
Once everything is back up and running, you’ll see an on/of button at the right bottom corner of the Rescutux wizard. Click on it and you’ll see “Shut down” on the menu. The computer will then power off.
At this point, you should remove the Rescutux media so that the machine doesn’t boot Rescutux the next time you turn it on instead of your regular OS.