Few weeks ago we showed you how to install ProFTPD in Ubuntu 14.04 and also said that by design, the FTP protocol is inherently insecure. If you have to implement FTP on your servers, you should opt for a secure FTP or SFTP.
This brief tutorial is going to show you how to implement SFTP in Ubuntu 14.04 if you haven’t done so. The primary reason FTP is insecure is that it sends its credential in clear text file.
Someone with the right tool could sit on your network easily intercept the data and retrieve your login credential for your FTP servers and login as in you. That’s the primary reason FTP is insecure, although there may be other reasons for FTP being insecure as well.
So, if you followed our previous tutorial on installing ProFTPD in Ubuntu and wish to secure the communication by using encryption, continue below to learn how to.
This post assumes that you’ve already installed ProFTPD in Ubuntu and you’re able to communicate and login to the server. If not, then please go back to our previous tutorial to learn how to install and use ProFTPD in Ubuntu 14.04.
Now that the server is installed, let’s go and create an SSL certificate to use to communicate with the serer. If you already have existing SSL certificates (public and private keys), then you can skip creating SSL part of the tutorial.
Just copy your public key to the correct directory (which I will show you below) and you’re done. If you don’t already have SSL encryption keys, then continue below to create one.
- Creating A SSL Certificate
Creating SSL certificate on a Linux machines is easy. All one have to do is run the ssh-keygen command. Not that simple if you want to do the same from a Windows machine.
Here’s how I did mine on a Windows machine.
I installed MobaXterm SSH client, the personal edition. Its free. MobaXterm enable a limited Linux Shell environment where you can run limited sets of Linux commands related to SSH, and other protocols.
Install it from here and run the commands below to generate a certificate.
ssh-keygen
This will generate an RSA 2048 bit key pair (Private and Public) and stored in your home directory. When using MobaXterm, it will be store in C:\Users\richard\Documents\MobaXterm\home\.ssh
Next, run the commands below from MobaXterm to copy your public key to the server using SSH. This is the easiest way.
ssh-copy-id [email protected] (the server IP address)
The above commands automatically uploads and create a ~/.ssh/ directory and a file called authorized_keys on the server. In that file is your public key.
Next, run the commands below to create a folder to store your public key SFTP communication.
sudo mkdir /etc/proftpd/authorized_keys
- Installing and Configuring ProFTPD
After setting up your SSL certificate, run the commands below to install ProFTPD server.
sudo apt-get update && sudo apt-get install proftpd
Next, run the commands below to edit ProFTPD configuration file.
sudo vi /etc/proftpd/proftpd.conf
Then change the value for ServerName to your server IP address as shown below
ServerName "192.168.1.2"
Next, uncomment the line below to keep users in their own directory.
DefaultRoot ~
Save the file and exit.
After that, run the commands below to create a new file which will contain SFTP module directives.
sudo vi /etc/proftpd/conf.d/sftpd.conf
Then copy and paste the lines below into the file and save it.
<IfModule mod_sftp.c>

SFTPEngine on

Port 2244

SFTPLog /var/log/proftpd/sftp.log

SFTPHostKey /etc/ssh/ssh_host_rsa_key

SFTPHostKey /etc/ssh/ssh_host_dsa_key

SFTPAuthMethods publickey

SFTPAuthorizedUserKeys file:/etc/proftpd/authorized_keys/%u

SFTPCompression delayed

</IfModule>
Save the file and close out.
Finally, run the commands below to copy your public key to the directory you created above.
sudo ssh-keygen -e -f ~username/.ssh/authorized_keys | sudo tee /etc/proftpd/authorized_keys/username
Replace username with your username.
Restart ProFTPD server by running the commands below.
sudo service proftpd restart
Now open FileZilla or your favorite FTP client and go to Edit –> Settings
Then click add to add your private key. It FileZilla will prompt you to convert the key into an appropriate format, do it and it will ask you to type a name for the file.
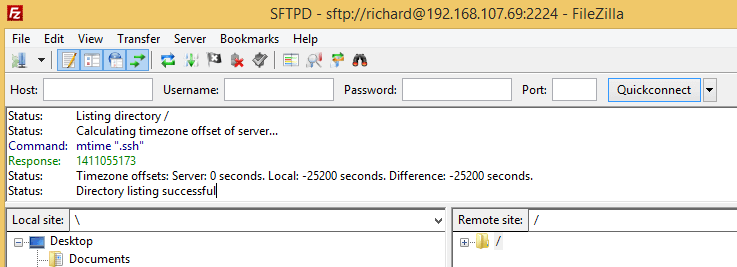
Once you’re done, you should be able to connect to the server easily using the port # you specified above.
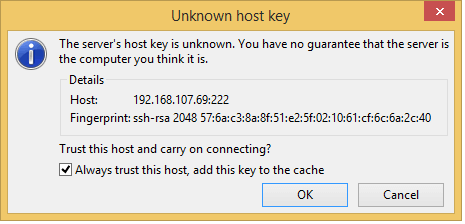
You’ll also be prompted by the server asking if you wish to accept the key for the server. Accept it by clicking OK
That’s it!
Enjoy!