Google Public DNS was launched almost three years ago and today they are enhancing it with support for DNSSEC Validation which will provide better protection from DNS based attacks and make your DNS more secure by identifying and rejecting invalid responses from DNSSEC-protected domain.
This brief tutorial is going to show you how to change your ISP provided DNS server addresses in Ubuntu with Google Public DNS Server addresses.
For those of us who don’t know about DNS, it is a service which translates human-readable domain, (eg. facebook.com) into IP addresses so that they are accessible by computers. Without DNS, it will be very difficult do know the IP addresses of all the websites you visit daily. So, instead of typing 31.13.74.7, which might be what your computer sees for facebook.com, you can just type facebook.com, which is much easier to remember than numbers.
To to take advantage of all the benefits of Google Public DNS service in Ubuntu, you will want to switch your current DNS provider to Google, and this brief tutorial is going to show you how to do it.
To get started, press Ctrl – Alt – T on your keyboard to open the terminal. When it opens, run the commands below to open the resolver file.
sudo gedit /etc/dhcp/dhclient.conf
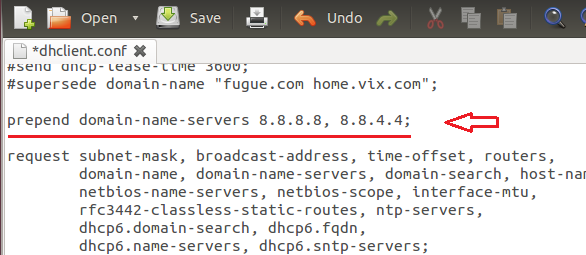
Finally, find the line shown below on your machine and change it to look like the highlighted line below. Google Public DNS primary server IP address is, 8.8.8.8 and the secondary IP address is 8.8.4.4
prepend domain-name-servers x.x.x.x, y.y.y.y;
Save the file and you’re done. Restart your computer and you’re done.
You can also use the Ubuntu GUI tool the make the switch. To do that, go to System Settings –> Network or Right-click Network Manager applet and select ‘Edit Connections’
Then edit the connection, select IPv4 Settings tab and change the connection method to ‘Automatic (DHCP) address only’
Than type Google Public Address into the DNS servers field as shown above.
Enjoy!