Here’s a quick tutorial that’s going to show you how to auto mount or map NTFS partitions in Ubuntu 12.10. For example, if you have another hard drive (Flash, IDE, SATA, etc.) that’s already formatted using NTFS file system which contains your data that you want to automatically map every time you sign into Ubuntu, then you’ll want to configure your system so that the drive is mounted.
NTFS (New Technology File System) is a proprietary file system developed by Microsoft for Windows systems. It’s the most popular file system being used in personal computers today. It was developed as a replacement for FAT, which is another file system that’s gradually being phase out. Even though NTFS was developed by Microsoft, other systems have adopted it, including Linux systems. NTFS improved support for metadata, and uses advanced data structuring which improves performance, reliability and disk utilization.
So, you have have a hard drive formatted with NTFS with your data on it and you which to auto mount it in Ubuntu, then this brief tutorial is for you.
To get stated, press Ctrl – Alt – T on your keyboard to open the terminal. When it opens, run the commands below to show you all devices attached to your computer. When you see the attached device, copy and UUID field. The UUID label will be used to map the drive.
sudo blkid
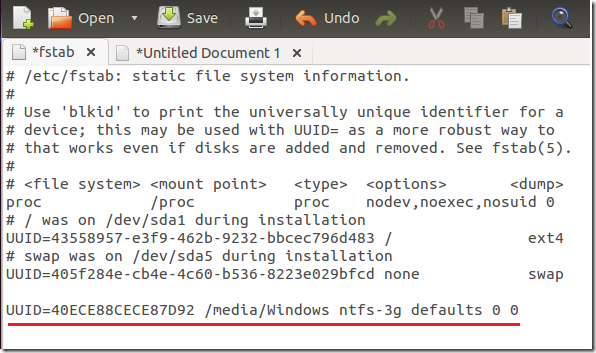
Next, run the commands below to open the fstab config file
gksu gedit /etc/fstab
When the file opens, add the line at the bottom of the file and
UUID=xxxxxxxxxxx /media/Windows ntfs-3g defaults 0 0
Finally, run the commands below to create the /media/Windows folder.
sudo mkdir -p /media/Windows
Then run the commands below to take ownership of that folder.
sudo chown -R username /media/WindowsReplace username with your account name.
Reboot and go to /media/Windows to access your data.
Enjoy!


