This tutorial will show you how to setup DNS server addresses in both Windows 7 and Ubuntu 12.04 (Precise Pangolin) from the command prompt / console. This might not be the most complicated tutorial, but will come in handy the day you’ll want to change your DNS server provider.
Almost all computers connected to the Internet use DNS services to locate websites. Not all DNS providers are the same. Some are faster than others, and others are more secured. So, if you need to change your DNS provider either in Windows or Ubuntu, then this tutorial is going to show you how to do it.
Objectives:
- Change DNS Servers in both Windows 7 and Ubuntu 12.04
- Enjoy!
How to Change DNS Server Addresses in Windows 7 from the Command Prompt
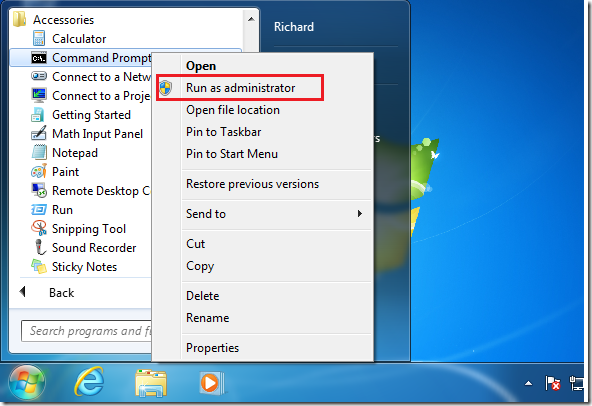
To change your DNS servers in Windows 7, go to Start –> All Programs –> Accessories –> and right-click on Command Prompt and select ‘Run as administrator’
Next, run the commands below to add your primary DNS server address:
netsh interface ip add dns name="Local Area Connection"  x.x.x.x index=1


Then run the commands below to add your secondary DNS server address:
netsh interface ip add dns name="Local Area Connection"  y.y.y.y index=2


That’s it! Now your computer will be assigned the addresses you configured.

How to Setup Static DNS Servers in Ubuntu 12.04 (Precise Pangolin)
To get setup static DNS servers in Ubuntu from the command prompt, press Ctrl – Alt – T on your keyboard to open Terminal. When it opens, run the commands below to open the dhclient.conf file.
sudo gedit /etc/dhcp/dhclient.conf


Finally, find the line highlighted below and remove the comment ( # ) before it. Then add the new DNS addresses as shown below:
prepend domain-name-servers x.x.x.x, y.y.y.y;


Replace x.x.x.x with your primary DNS address and y.y.y.y with your secondary DNS server address.

Restart your computer and the new addresses will be applied.

Enjoy!


