
Editing programs are some of the most useful and versatile types of software available. A person never knows when they may need to edit a family photo, a downloaded audio file, or even a video.
The latter can be the most intensive. Editing videos requires a lot of hardware processing power, a knowledgeable individual behind the controls, and of course, the right type of tool in their hands. With the right video editing software, a person can make professional looking edits while taking less of a toll on hardware and requiring less professional expertise.
There’s also a benefit to having a software that’s free – after all, everyone loves something for nothing. This is especially true if they’re trying to edit a video and want linear modification capabilities, a variety of helpful filters, and more. When you’re looking for great software that is free, look no further than the open-source library.
Avidemux is one of the most popular types of free and open-source video editing software available. With a simple and easy-to-navigate layout, it makes editing easy and keeps all necessary tools in one place. The program was written from scratch, and uses handy features like a project system saving option and has received plenty of positive reviews.
Here’s a brief Avidemux tutorial, including information about the software’s background, construction, and who it appeals to most.
The History and Background of Avidemux
Any good Avidemux tutorial should always start out by looking at where the software came from. As with most open-source programs, it was developed for open-source operating systems as an alternative to proprietary video editing software.
These days, you can find Avidemux on Linux, BDS, Mac OS X, and even Microsoft Windows. It is available for use under the GNU GPL license. Designed to handle simple editing, encoding, and filtering tasks, Avidemux has become a reliable choice for anyone seeking base-level video editing software for free.
The core of the program was written from scratch, but some protocols from FFmpeg, MPlayer, Transcode, and Avisynth were implemented into it over time. As with most open-source programs, this one is open to user input and relies heavily on community feedback for refining and improving it over time.
It was designed to be capable of compiling C++, GTK+, and the SpiderMonkey JavaScript engine. In addition to the standard command-line interface, the program offers to separate graphical interfaces – one based around GTK+ and another based around Qt.
Like almost all software, open-source or otherwise, Avidemux has gone through several key improvements throughout its short lifespan. Since June 2018, the software has seen improvements to the interface, smoother zooming capabilities on resized windows, and even a more responsive cutting tool.
Now let’s look at some of the standard applications the software can be used for and understand which type of projects it can be useful for. This can also help a person understand how the individual features of the program stack up to one another, and to other similar programs in the same genre.
Avidemux Tutorial: Basic Features and User Options
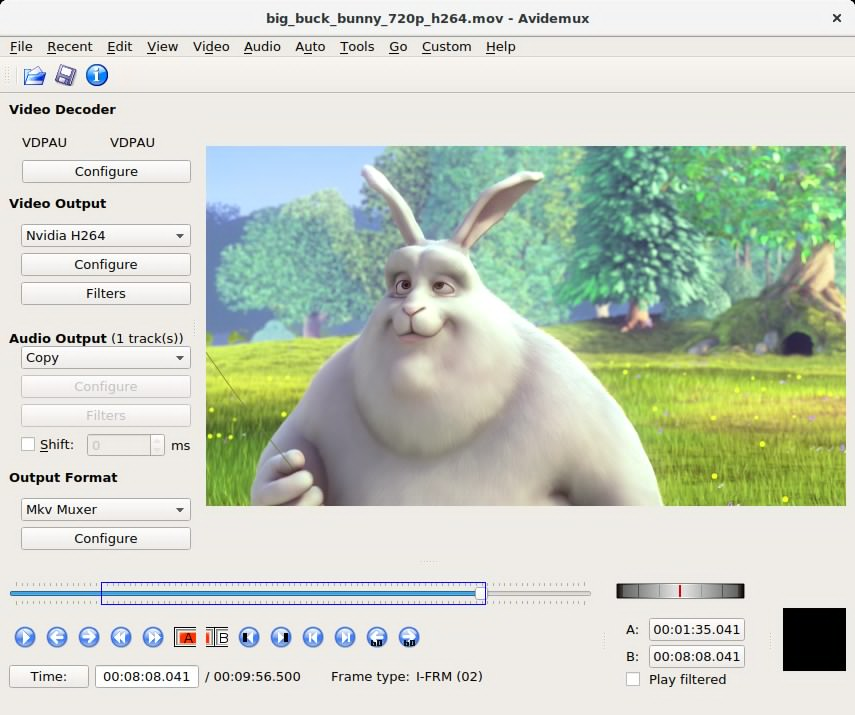
Moving on with the Avidemux tutorial, let’s examine exactly how the common functions users may want to perform can be accessed through this program. To start, let’s go with basic editing. For starters, you’ll need to open your video in the program – as with most editors, this can be done by clicking the Open button located on the top left.
Click Open again under the drop-down options to access a file manager, then select any video you’d like to edit. It is at this point you may notice the controls at the bottom become active. They’re the standard commands you’d expect – including A and B, which correspond with the beginning and end of the project in question.
These buttons can be programmed to allow for certain frame numbers or millisecond markers to represent the beginning or end of a file. This makes it easy for you to do things like edit out unnecessary content at the start or end of videos and even eliminate small portions while making the edit look clean.
If you choose to save the project, it will do so with the content between your selected markers and create a copy. When you’re saving copies, you can choose the type of video and audio codecs you prefer from the available menu on the left-hand side. Many people who edit videos look to do so because they want to change the format for compatibility purposes, and this software makes it easy.
You can press the Configure button below the codec selection menu and experiment with the different options. Some work better with a given aspect ratio than others, whereas others may require you to experiment with filters to make them look right.
You can do this by checking out the Filter menu, or accessing individual filters among the individual tabs at the top. Certain filters will offer real-time previews, which is very useful when you’re doing things like cropping sections or adding transition filters. You can add logos, remove logos, change color balance, and more through the variety of filters offered in this software.
While this is a basic Avidemux tutorial according to the standard features, what about the user experience as a whole? Will a person who tries out Avidemux notice any overt perks? Are there any obvious cons they will find out when they’re using this program?
What About the User Experience with Avidemux?
The first thing a person will notice when they download Avidemux is the interface. While some may describe it as basic or primitive, it’s marketed as simple. This is the telling factor of Avidemux – while there are certainly more robust and complex programs out there, this one aims to make video editing a simple process.
For the basics, it’s easy. Making simple edits, clips, splits, and other common functions are fast and efficient. There are no complex control schemes to learn or multitude of layered control panels to sift through.
The audio aspect of this program is also worth mentioning. You can configure up to four different audio tracks at separate volume settings and speaker configurations as needed, making it easy for you to experiment with cool panning effects, add background tracks, and more.
You’ll also enjoy the variety of export options, particularly if you’ve ever dealt with the pain of using a video editor without them. Many programs require a person to download a standalone or supplementary program for encoding and format conversion. With Avidemux, you can convert the file to your selected format right in the program for added convenience.
While there’s no timeline and a limited number of effects, the benefits are clear. You’ll enjoy a clear interface, great encoding options, and an impressive array of features for sharpening and denoising.
How does the software stack up to the competition? We’ll examine three of its main competitors briefly to observe the similarities and differences.
1. Lightworks
This is by far one of the most, if not the most, robust free video editors around. It has more capabilities than Avidemux, including real-time options, but the tradeoff is that it is much more complex. The workflow takes some time to adjust to, and the interface could be intimidating to new users.
2. VideoPad
This is another program that offers more features than Avidemux, though not as many as Lightworks. It’s simple to use, so it has a similar advantage to Avidemux in that regard. However, it doesn’t offer as many encoding and conversion options, meaning you could need a separate program to handle those needs.
3. Shotcut
Shotcut is a great program with plenty of filters, great options for file format support, and a clear well-organized interface. But it does fall short in one area, which is ready-made profiles for exporting to different devices.
These are just a few of the common free video editors people may choose alongside Avidemux. While each has some great things to offer, there are also a lot of good reasons to choose Avidemux when you are weighing your options.
The Final Verdict: Avidemux is a Great New Option
Though it may not have the type of longevity as some other video editors, even those of the free variety, Avidemux has a lot of perks.
In addition to the fact that it’s free, it’s very easy to use. A simple interface with all main functions being easy to find means you can save time and frustration. For most people, one of the more important aspects of a video recording program is the ability to be able to use it without much of a learning curve. Avidemux accomplishes this perfectly, while mixing in a number of great effects.
From cropping options to filters, the program has everything you need to help transform videos and make them look great. Add in the variety of encoding options, and you have an all-in-one program useful for any basic video editing need. There may be more robust software out there, but you’d be hard pressed to find a better basic free program than Avidemux.