Here’s an ultimate guide to installing Nginx, PHP5, MySQL support on CentOS 6.5. This guide will show you how to prepare CentOS 6.5, how to install Nginx web server, MySQL database server with PHP5 support.
It should be handled and read as a complete guide to getting these services up and running. At the end of this post, I will include the short guide to install WordPress as well.
When Nginx, MySQL and PHP5 are installed, getting WordPress to work should be easy.
If you ever wanted to get WordPress working in CentOS with Nginx, then this is the guide to read. It will cover everything to get you started with running WordPress, Nginx, PHP5 and MySQL in CentOS.
Before you can get started, make sure you have root or administrative access to the CentOS server. If you have no admin rights, then you should should stop right here or keep reading just for fun.
For this tutorial, I installed the latest VirtualBox software on a Windows 8 host machine and enabled machine with CentOS 6.5 Linux machine.
If you already have a host account with full access to a CentOS server online, this should work as well.
When you’re ready, log on to the CentOS machine and update it using the commands below.
yum update
After updating the server, continue below.
- Enable additional software repositories
CentOS comes with its default repositories installed. However, if you want to install the latest and greatest software in CentOS, you may want to enable additional repositories.
Two of very popular repositories are Epel and Remi. To get them installed, run the commands below.
- Add Epel Repository
rpm --import https://fedoraproject.org/static/0608B895.txt
rpm -ivh http://dl.fedoraproject.org/pub/epel/6/x86_64/epel-release-6-8.noarch.rpm
- Add Remi Repository
rpm --import http://rpms.famillecollet.com/RPM-GPG-KEY-remi
rpm -ivh http://rpms.famillecollet.com/enterprise/remi-release-6.rpm
After running the above commands, continue below to enable these repositories.
- Enabling both Epel and Remi repositories
The next step is to enable the installed repositories. By default some of these repositories are disabled. To enable a repository, open the repository configuration file in this directory /etc/yum.repos.d/
Epel repository file is at vi /etc/yum.repos.d/epel.repo
Then make sure that enabled has a value of 1 (1 enables, 0 disables)
Remi repository file is at vi /etc/yum.repos.d/remi.repo
When both repositories are enabled, begin installing Nginx, MySQL, PHP5 and other tools.
- Installing Nginx Web Server
First thing is we’re going to install Nginx web server. This is a main component of the of any web server configuration. To install Nginx in CentOS, run the commands below
yum install nginx
- Installing & Securing MySQL Database Server
Installing MySQL database server in CentOS is easy. To do that, run the commands below
yum install mysql mysql-server
Next, run the commands below to configure and secure MySQL database server.
mysql_secure_installation
If you’re prompted for a password, leave the password field blank and press Enter if you haven’t created a root password for MySQL database.
If you’re unable to continue, it may mean MySQL database server isn’t started or running. To start it, run the commands below.
service mysqld start
When you run the command above, you’ll be prompted to choose between Y for Yes and N for No. When prompted, always choose Y for yes until you’re done.
- Installing PHP5 and other tools.
PHP5 is another important package that allows for WordPress and most websites to function. Without PHP, many of the online websites won’t function.
To install PHP5 and other tools, run the commands below.
yum install php5 php-fpm php-cli php-mysql php-gd php-imap php-ldap php-odbc php-pear php-xml php-xmlrpc php-magickwand php-magpierss php-mbstring php-mcrypt php-mssql php-shout php-snmp php-soap php-tidy
Now that Nginx, MySQL server and PHP5 are installed, it’s not time to begin configuring each service.
- Always startup servers and services
When running a web server or critical services, you want to make sure that if the server is restarted, these servers and services should automatically be started as well.
Always start Nginx when system restarts
chkconfig --level 235 nginx on
Always start MySQL server
chkconfig --level 235 mysqld on
Always start PHP-FPM
chkconfig --level 235 php-fpm on
- Configuring Nginx Web Server
The next step is to configure Nginx web server. Nginx keeps its configuration files in this directory. /etc/nginx/
The global configuration is /etc/nginx/nginx.conf
The global config file should work without changing anything by default.
The next file is the web configuration file. This file contains declarations for each website you’re hosting. This default web config file is at /etc/nginx/conf.d/default.conf
This is the file you’ll want to change for the default website to work. Edit it using the commands below.
vi /etc/nginx/conf.d/default.conf
By default, the Nginx should work without changing anything. All you have to do is open a web browser and type hostname or the IP address to the machine and Nginx will return its default test page.
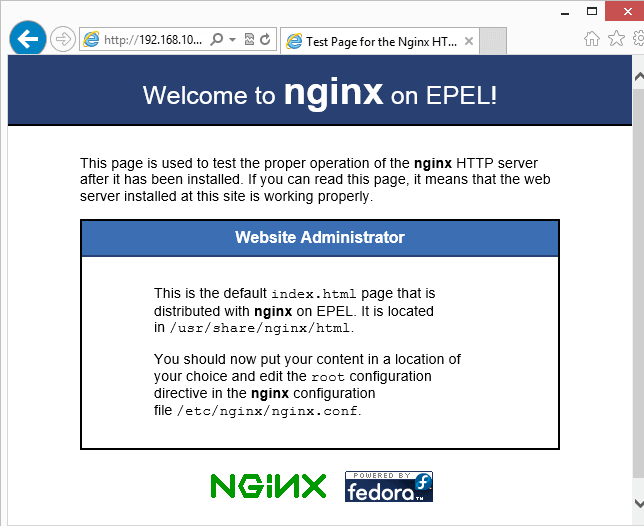
Nginx works!
If Nginx isn’t able to connect or you’re unable to access the web page, it’s likely that firewall is blocking the connection. To allow http or port 80 through the firewall, run the commands below.
iptables -I INPUT 5 -i eth0 -p tcp --dport 80 -m state --state NEW,ESTABLISHED -j ACCEPT
Save the file using the commands below
service iptables save
Try again to see if you can see the default site.
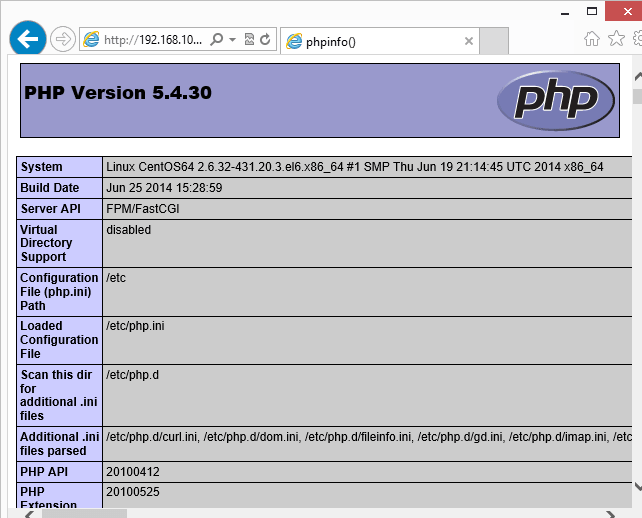
Testing if PHP works.
To verify if PHP5 works, create this test file in Nginx root directory wit this content.
vi /usr/share/nginx/html/phpinfo.php
Add this content and save.
<?php
phpinfo();
?>
Next, you’ll have to configure Nginx to process PHP content. Nginx doesn’t support PHP content by default, you must make some changes to its web config file.
Edit it vi /etc/nginx/conf.d/default.conf
Then uncomment the section shown in the image below.
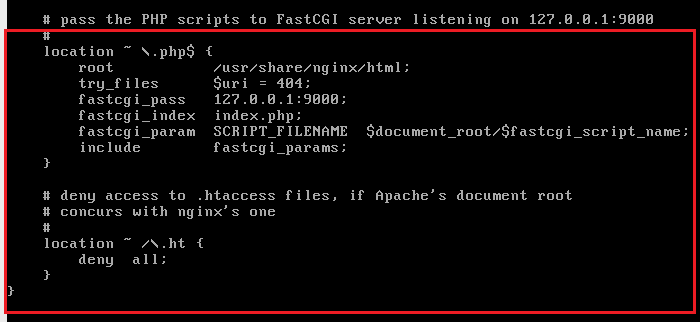
Save the changes and restart nginx and php-fpm.
You should see something like what’s below.
This is the basic setup for Nginx, more advanced setup is required for WordPress and other web scripts to function correctly. All our tests are good.
Nginx is responding, PHP5 is up and MySQL database server is installed.
Our next tutorial will show you how to get WordPress installed and configured with these servers and services.
until then, please stay tuned.
Enjoy!