A file system is a part of the operating system that determines how file are named, stored and organized. It manages files and folders and the information that are needed to find them. Every major operating system has files system. Windows, Mac OS X and Linux have file systems. They are very important in any operating system.
These operating systems have file systems that were designed for them individually. That’s why moving a file system from a Linux machine to a Windows machine without some third party tool won’t work. The same is true when taking a file system from a Windows machine to a Linux system.
NTFS is a file system developed by Microsoft for Windows machines. It provides performance, reliability and advanced features not available in FAT.
This brief tutorial is going to show you how to mount a NTFS partition in Ubuntu easily. To make is work without problems, we’re going to install a tool called ntfs-3g.
To get started, let’s install ntfs-3g if it’s not installed already. To install it, run the commands below
sudo apt-get install ntfs-3g

Next, find out all mounted partitions attached to your computer by running the commands below.
sudo blkid


The above command shows you a list of devices attached to your machine. Notice the highlighted line. It shows you where the device is mounted, the device label (name), the unique ID and the file system type.
To mount a device manually from the command line you use the disk location (/dev/sdb1).
sudo mount -t ntfs-3g /dev/sdb1 /media/$USER/


To access the mounted device, go to /media/username.
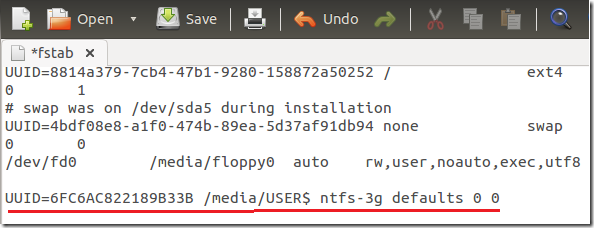
To mount the device automatically everytime you sign into Ubuntu, open the fstab file, then add the mount command.
sudo gedit /etc/fstab

Next, add the line below at the end of the file. When mounting using the fstab file, always use the device unique ID (UUID).
UUID=6FC6AC822189B33B /media/USER$ ntfs-3g defaults 0 0


That’s it! To access the mounted volume, open it from the launcher or go to /media/username. Replace username with your account name.
Enjoy!


