This brief tutorial is going to show you how to create a Samba file server in Ubuntu and allow client computers to access files with different permission levels.
In this post, we’re going to create three folders with different levels of permissions. One shared folder will allow everyone to access everything in it.
Another folder will only allow members of a particular group to access resources and files and the last shared directory will only allow a single user or users who are permitted to access these resources.
The client computers can be Windows, Mac OSX and other Linux systems. Users on these machines will be able to use their respective file explorer program to access these shared directory remotely file Samba or SMB protocol.
The server hosting these resources will have Ubuntu 14.04 LTS version with hostname srvr01 and IP address 192.168.0.1.
For this to work correctly, all these machines need to be in the same workgroup defined on the Samba server. Since the default Workgroup for Windows, Linux and Mac OSX machines is ‘Workgroup’, we’ll be configuring our systems members of this workgroup.
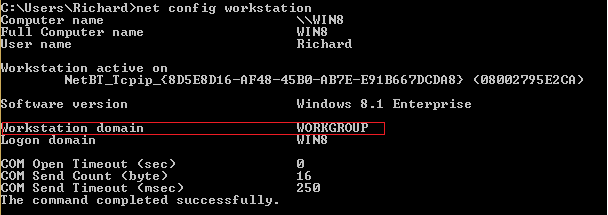
To view Windows machine workgroup membership, open the command prompt and run the commands below.
net config workstation
Take notes of the workstation domain name. That’s the workgroup the machine belongs to.
Now that you know the workgroup name, let’s also enter the server IP address in the host file of the client machines. In Windows, open the command prompt as administrator and run the commands below.
notepad C:\Windows\System32\drivers\etc\hosts
When the host file opens, type the server IP address on a new line followed by the hostname. When you’re done, save the file and close.
192.168.0.1 srvr1.domain.com srvr1
Next, go to the server and install Samba and other related tools.
- Installing Samba in Ubuntu 14.04
To install Samba in Ubuntu, run the commands below.
sudo apt-get install -y samba samba-common python-glade2 system-config-samba
Now that Samba is installed, let’s go and backup the default configuration file for Samba. Backing up configuration files is always a good idea.
To do that, run the commands below.
sudo mv /etc/samba/smb.conf /etc/samba/smb.conf.bak
After backing up the file, let’s create our own configuration file for Samba by running the commands below.
sudo vi /etc/samba/smb.conf
In this file, we’ll want to add Samba global configuration directives block below.
 [global]

workgroup = WORKGROUP

server string = Samba Server %v

netbios name = srvr1

security = user

map to guest = bad user

name resolve order = bcast host

dns proxy = no
The configuration block above defines how security is managed, which server name to use to connect and the workgroup that’s assigned to the server.
When you’re done entering the global config block above save the file and exit.
- Creating Samba Shares
Now that we’ve installed Samba and set it’s global configuration, let’s go and create the directory we’ll want to share with everyone.
sudo mkdir -p /samba/allaccess
After the directory is created, make sure to change the ownership of it to nobody. This allows everyone to have access to it. To do that, run the commands below.
 cd /samba

sudo chmod -R 0755 allaccess

sudo chown -R nobody:nogroup allaccess/
- Enabling Samba Shares For Allaccess Directory
The next step now is to define the allaccess directory in Samba configuration file to enable all access via Samba. To do that, type the share block below to allow full access to everyone using Samba or SMB protocol.
 [allaccess]

path = /samba/allaccess

browsable = yes

writable = yes

guest ok = yes

read only = no
Now Samba configuration should should look like the block below. Samba global block and all access defined.
[global]

workgroup = WORKGROUP

server string = Samba Server %v

netbios name = srvr1

security = user

map to guest = bad user

name resolve order = bcast host

dns proxy = no

#============================ Share Definitions ==============================

[AllAccess]

path = /samba/allaccess

browsable =yes

writable = yes

guest ok = yes

read only = no
Restart Samba by running the commands below.
sudo service smbd restart
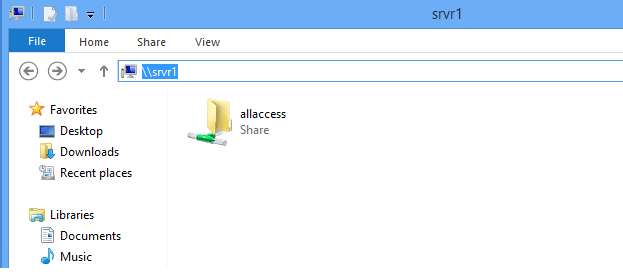
Save the file and try to access the AllAccess share from a Windows client. To do that click the Run box and type \\srvr1\allaccess
You should be able to the folder. If not, check your configuration again.
Everyone should be able to access the AllAccess folder without prompting for password.
- Creating secure shares
To create a secure share where only member of a certain group can access, create a the folder and define it in Samba configuration file.
First create the folder inside the AllAccess folder called Secured
sudo mkdir -p /samba/allaccess/secured
Next, change into the AllAccess folder and change the permission on the secured folder so that only member of a group can access it.
Create the new group that will access that folder.
sudo addgroup securedgroup
Then change the ownership and permission on the secured folder so that only member of the securedgroup can access it.
cd /samba/allaccess

sudo chown -R richard:securedgroup secured

sudo chmod -R 0770 secured/
Then open Samba configuration file again and define the secured shared
sudo vi /etc/samba/smb.conf
Add the secured share block in the file and save it.
[secured]

path = /samba/allaccess/secured

valid users = @securedgroup

guest ok = no

writable = yes

browsable = yes
Restart Samba again and begin adding users to the securedgroup so they can access the secured folder.
To add user richard the the secured group, run the commands below.
sudo usermod -a -G securedgroup richard
For each user you want access a secured Samba folder, that you must be in Samba user database. Now that you’ve added richard to the secured group, you must also create a Samba password for richard.
Run the commands below to add richard to Samba database.
sudo smbpasswd -a richard
You’ll be prompted to create a new Samba password for richard in order to access the shared location.
Restart Samba for user Richard to access the secured share.
sudo service smbd restart
If you only want a particular user to access the secured share, replace the @securedgroup with the username. That’s it!
Enjoy!


