This brief tutorial is going to show you how to easily and properly mount external devices in Ubuntu automatically. These devices can be used as a backup storage to protect your important information in the event your computer dies or crashes. Nowadays, it easy to get hold of external USB devices that can store terabyte of data, and using these devices as a backup locations to keep your data secure is a smart move.
Computers have become a vital part of our lives. We use them at our work, school and in our homes. They contain so much information such as photos, documents, recipes and other important data that we can’t afford to lose. One thing you don’t want to do to is do nothing to
protect your information from accidental deletion or virus attack that corrupts your computer with all your data on it.
That’s why configuring an automatic backup and restore plan for your systems is smart.
This post will be divided into two parts. Part one will show you how to automatically mount your external USB devices and part two shows you how to configure Ubuntu to backup your documents and information to your mapped devices. This is an opportunity for you to protect yourself and keep your data secure.
To get started, attach all your USB devices to your Ubuntu machine. If you have more than one USB drives, plug them into your computer.
After that, press Ctrl – Alt – T on your keyboard to open the terminal. When it opens, run the commands below to show all the attached devices.
sudo blkid
Each USB device will show its unique ID and the file system type. In most cases it will either be vfat or NTFS partition for the device. What you need to do here is take notes of the device ID UUID=xxxxxxxxxxx and the file system type.
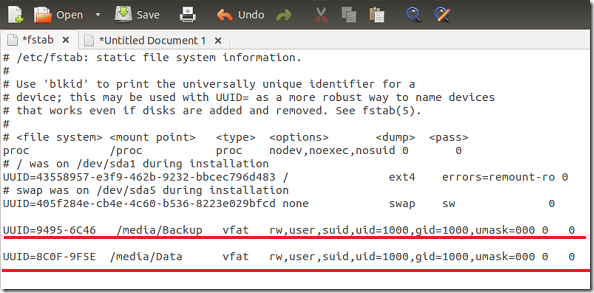
Next, type the commands below to open the fstab configuration file. This is where we’re going to specify how and where the device should be mounted.
gksu gedit /etc/fstab
Then add this line at the end of the file and save.
UUID=XXXX-XXXX /media/Backup vfat rw,user,suid,uid=1000,gid=1000,umask=000 0 0
Add the line above for each device you wish to mount or map in Ubuntu. Mine uid and gid is 1000, yours might be different. To find out your uid in Ubuntu, run the commands below:
id -u username
id –g username
Replace username with your username in Ubuntu.
Save the file and close out. After that, you’ll want to create the mount point which is /media/Backup in my fstab file. To create it, run the commands below:
sudo mkdir -p /media/Backup
After creating it, take ownership of it so you can be able to write to that location. To take ownership, run the commands below.
sudo chown -R username /media/BackupReplace username with your username in Ubuntu.
That’s it! Every time you sign into Ubuntu, you device will be mounted at /media/Backup or to whatever location you specified.
In our next post, I’ll show you how to setup a backup and restore process so that your files are stored to your external devices.
Enjoy!


